how to setup fully DMARC aligned emails in AWS SES
/ 7 min read
Table of Contents
Highlevel
- You want DMARC compliant emails so your emails don’t bounce from user’s email inboxes.
- You want DMARC compliant emails so your domain can’t be highjacked by nefarious third parties to send spam and phishing emails.
- There are some common pitfalls when setting up SES for DMARC alignment. This guide will help you avoid them.
TL;DR on SPF, DKIM, and DMARC
Before we get into it, it’s good to have at least a high level understanding of what SPF, DKIM, and DMARC actually mean:
- SPF: If the email doesn’t come from this IP address, don’t trust it.
- DKIM: If the email doesn’t have this signature on it, don’t trust it.
- DMARC: I’ve received an email that I don’t trust, what should I do with it?
Overview
For this guide, I’ll be using the domain superfundsage.com and Cloudflare as the DNS provider. We’ll be sending emails from the subdomain mail.superfundsage.com. This domain has 0 config in DNS outside of a CNAME record pointing to the Superfund Sage app. This can be verified using Dmarcian’s domain checker (one of the tools we’ll be using extensively in this guide).
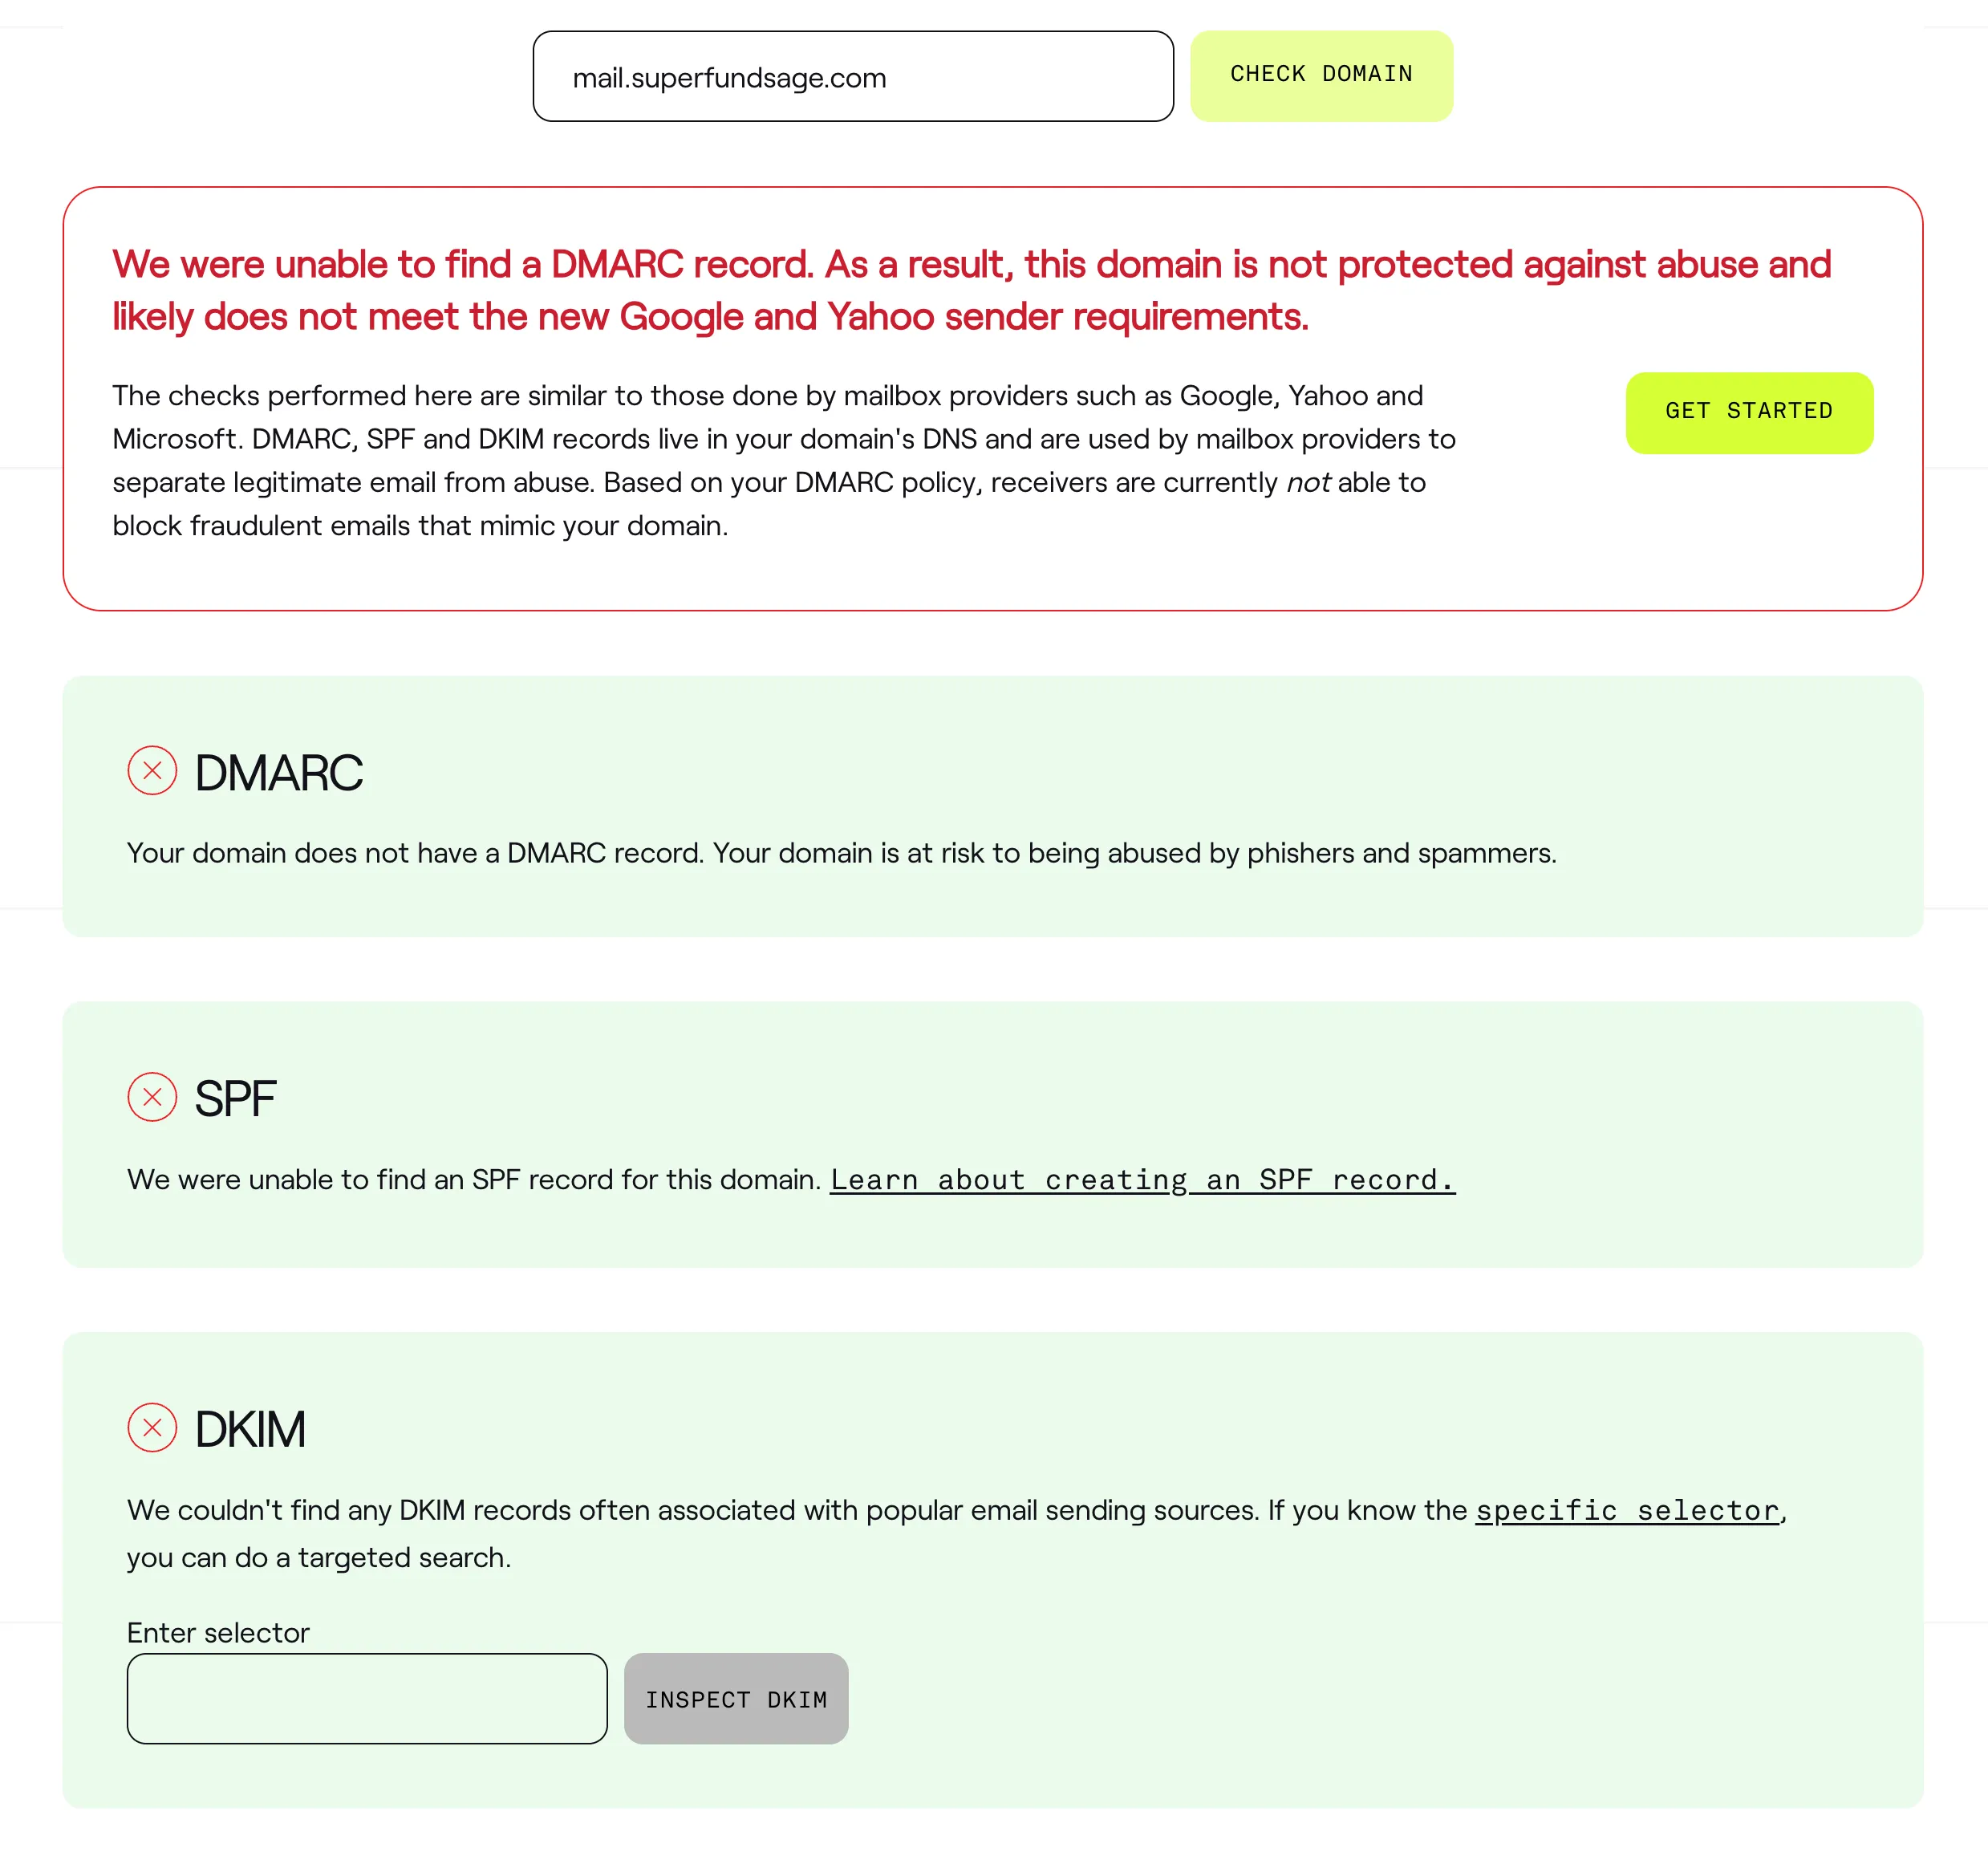
By the end of this guide, we’ll turn those failing checks into passes.
Setting up a domain identity in SES
The first thing you want to do is set up a domain identity in AWS SES like so:
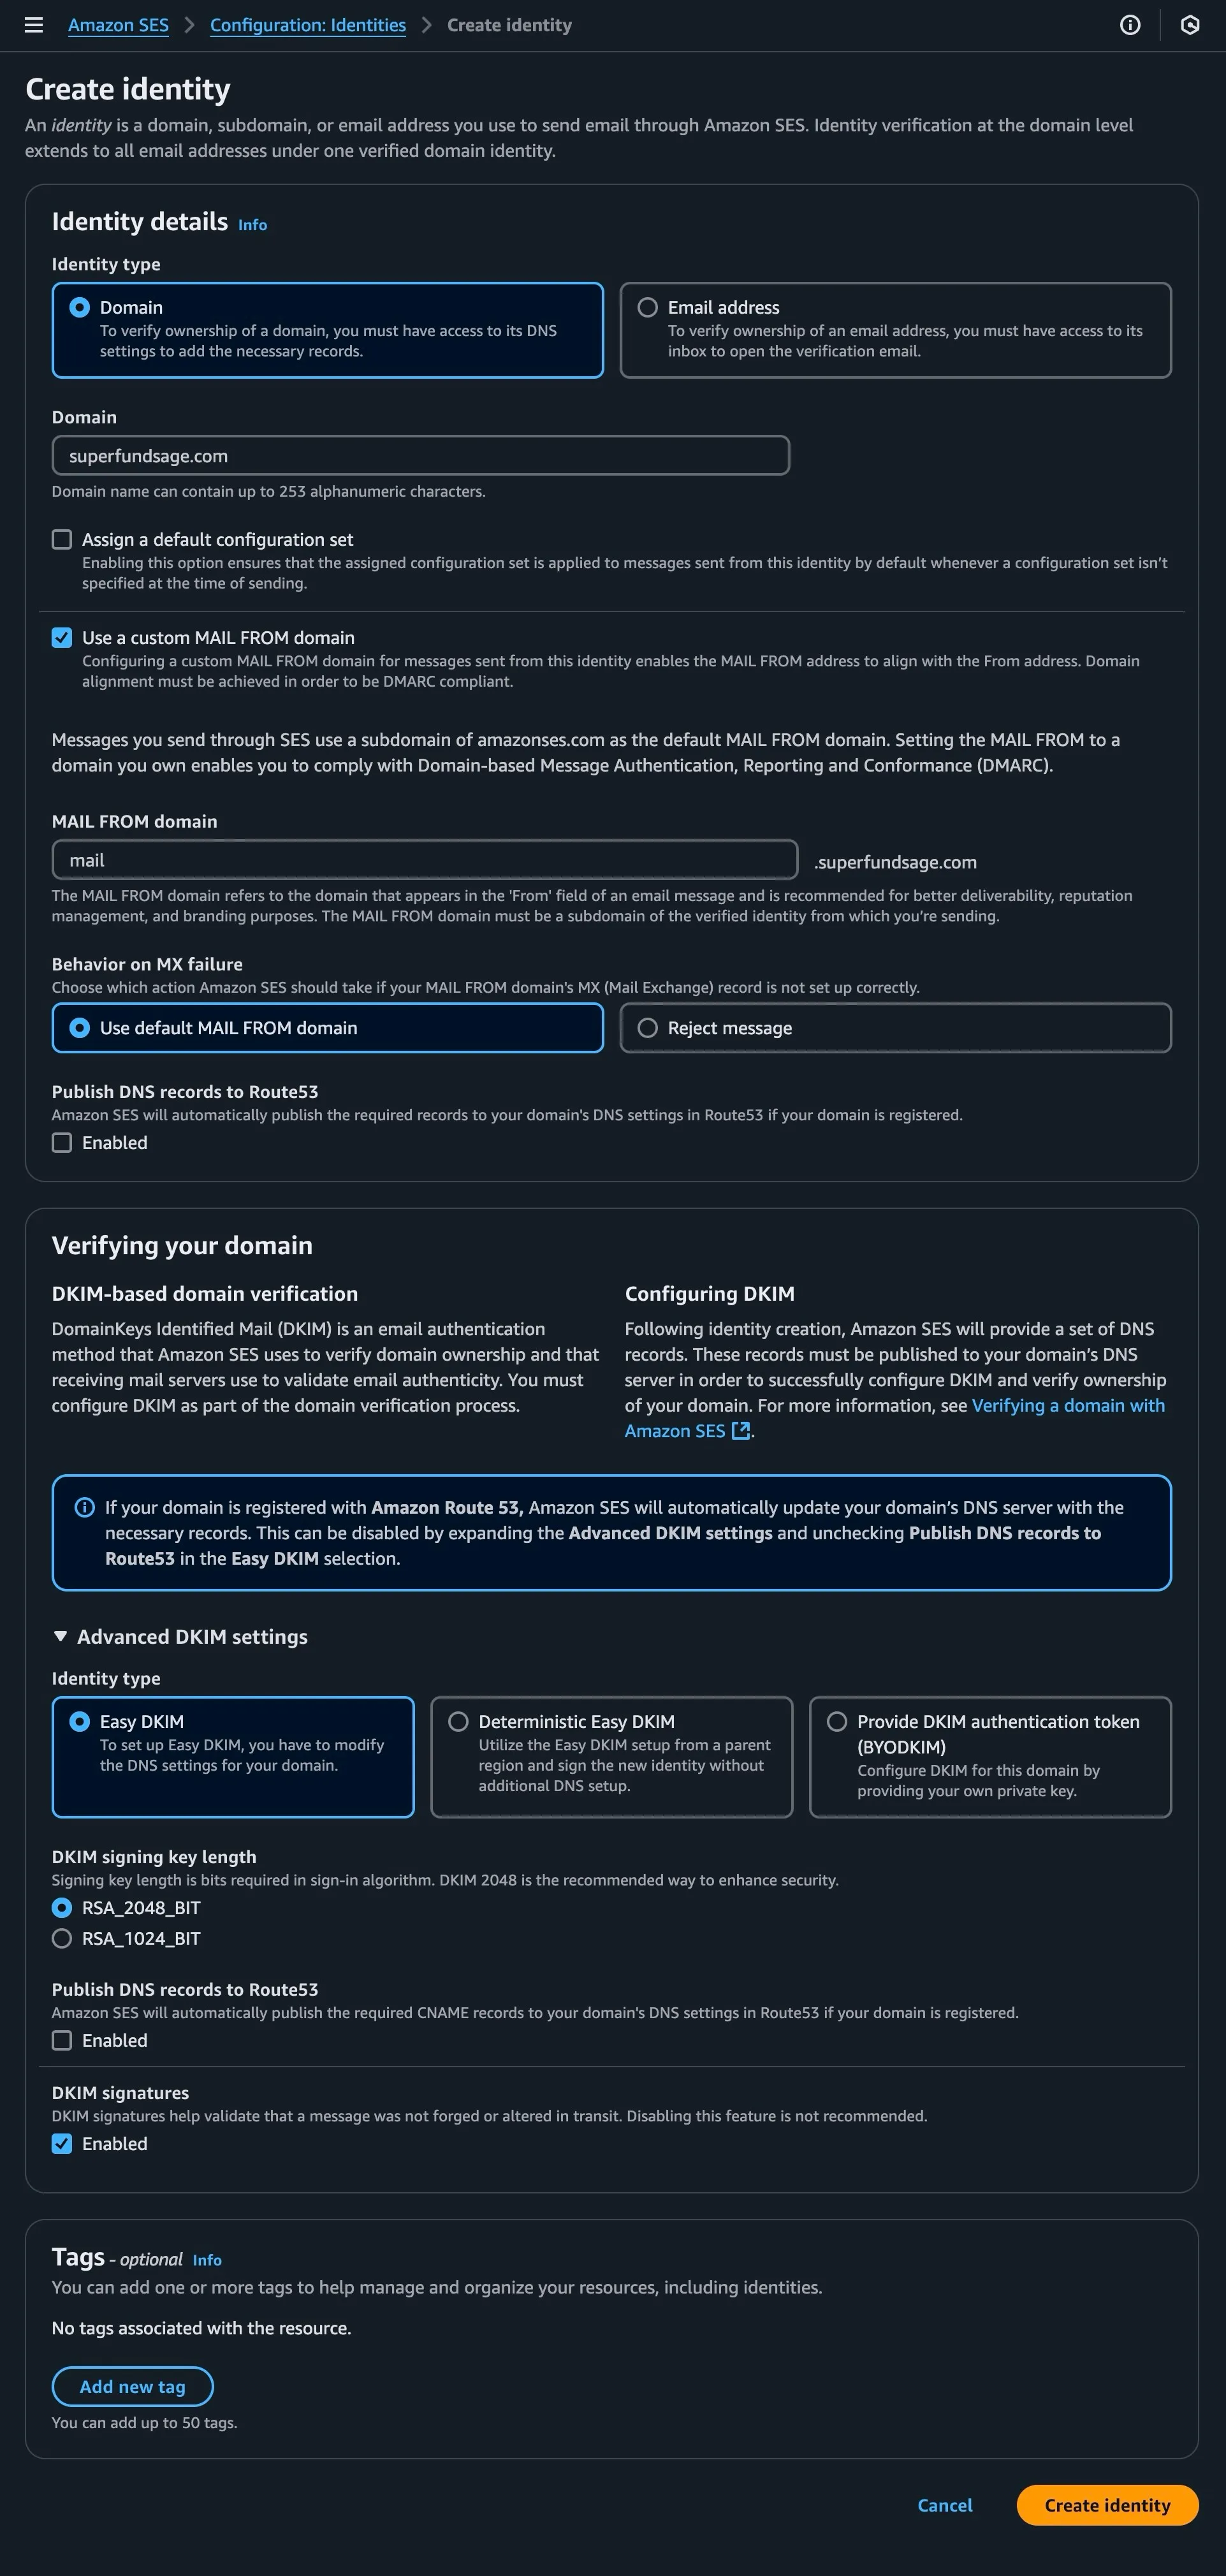
If you’re not using an external-from-AWS DNS provider, you can keep the ‘Publish DNS records to Route53’ options ticked.
- One important thing to note is if you’re sending from a sub domain eg
mail.superfundsage.com, you should create the domain identity using the root domain egsuperfundsage.com. Source
…when you verify a domain identity, you can send email from any subdomain or email address of the verified domain without having to verify each one individually.
Setting up DKIM
SES gives you three CNAME records to add to your DNS for DKIM.
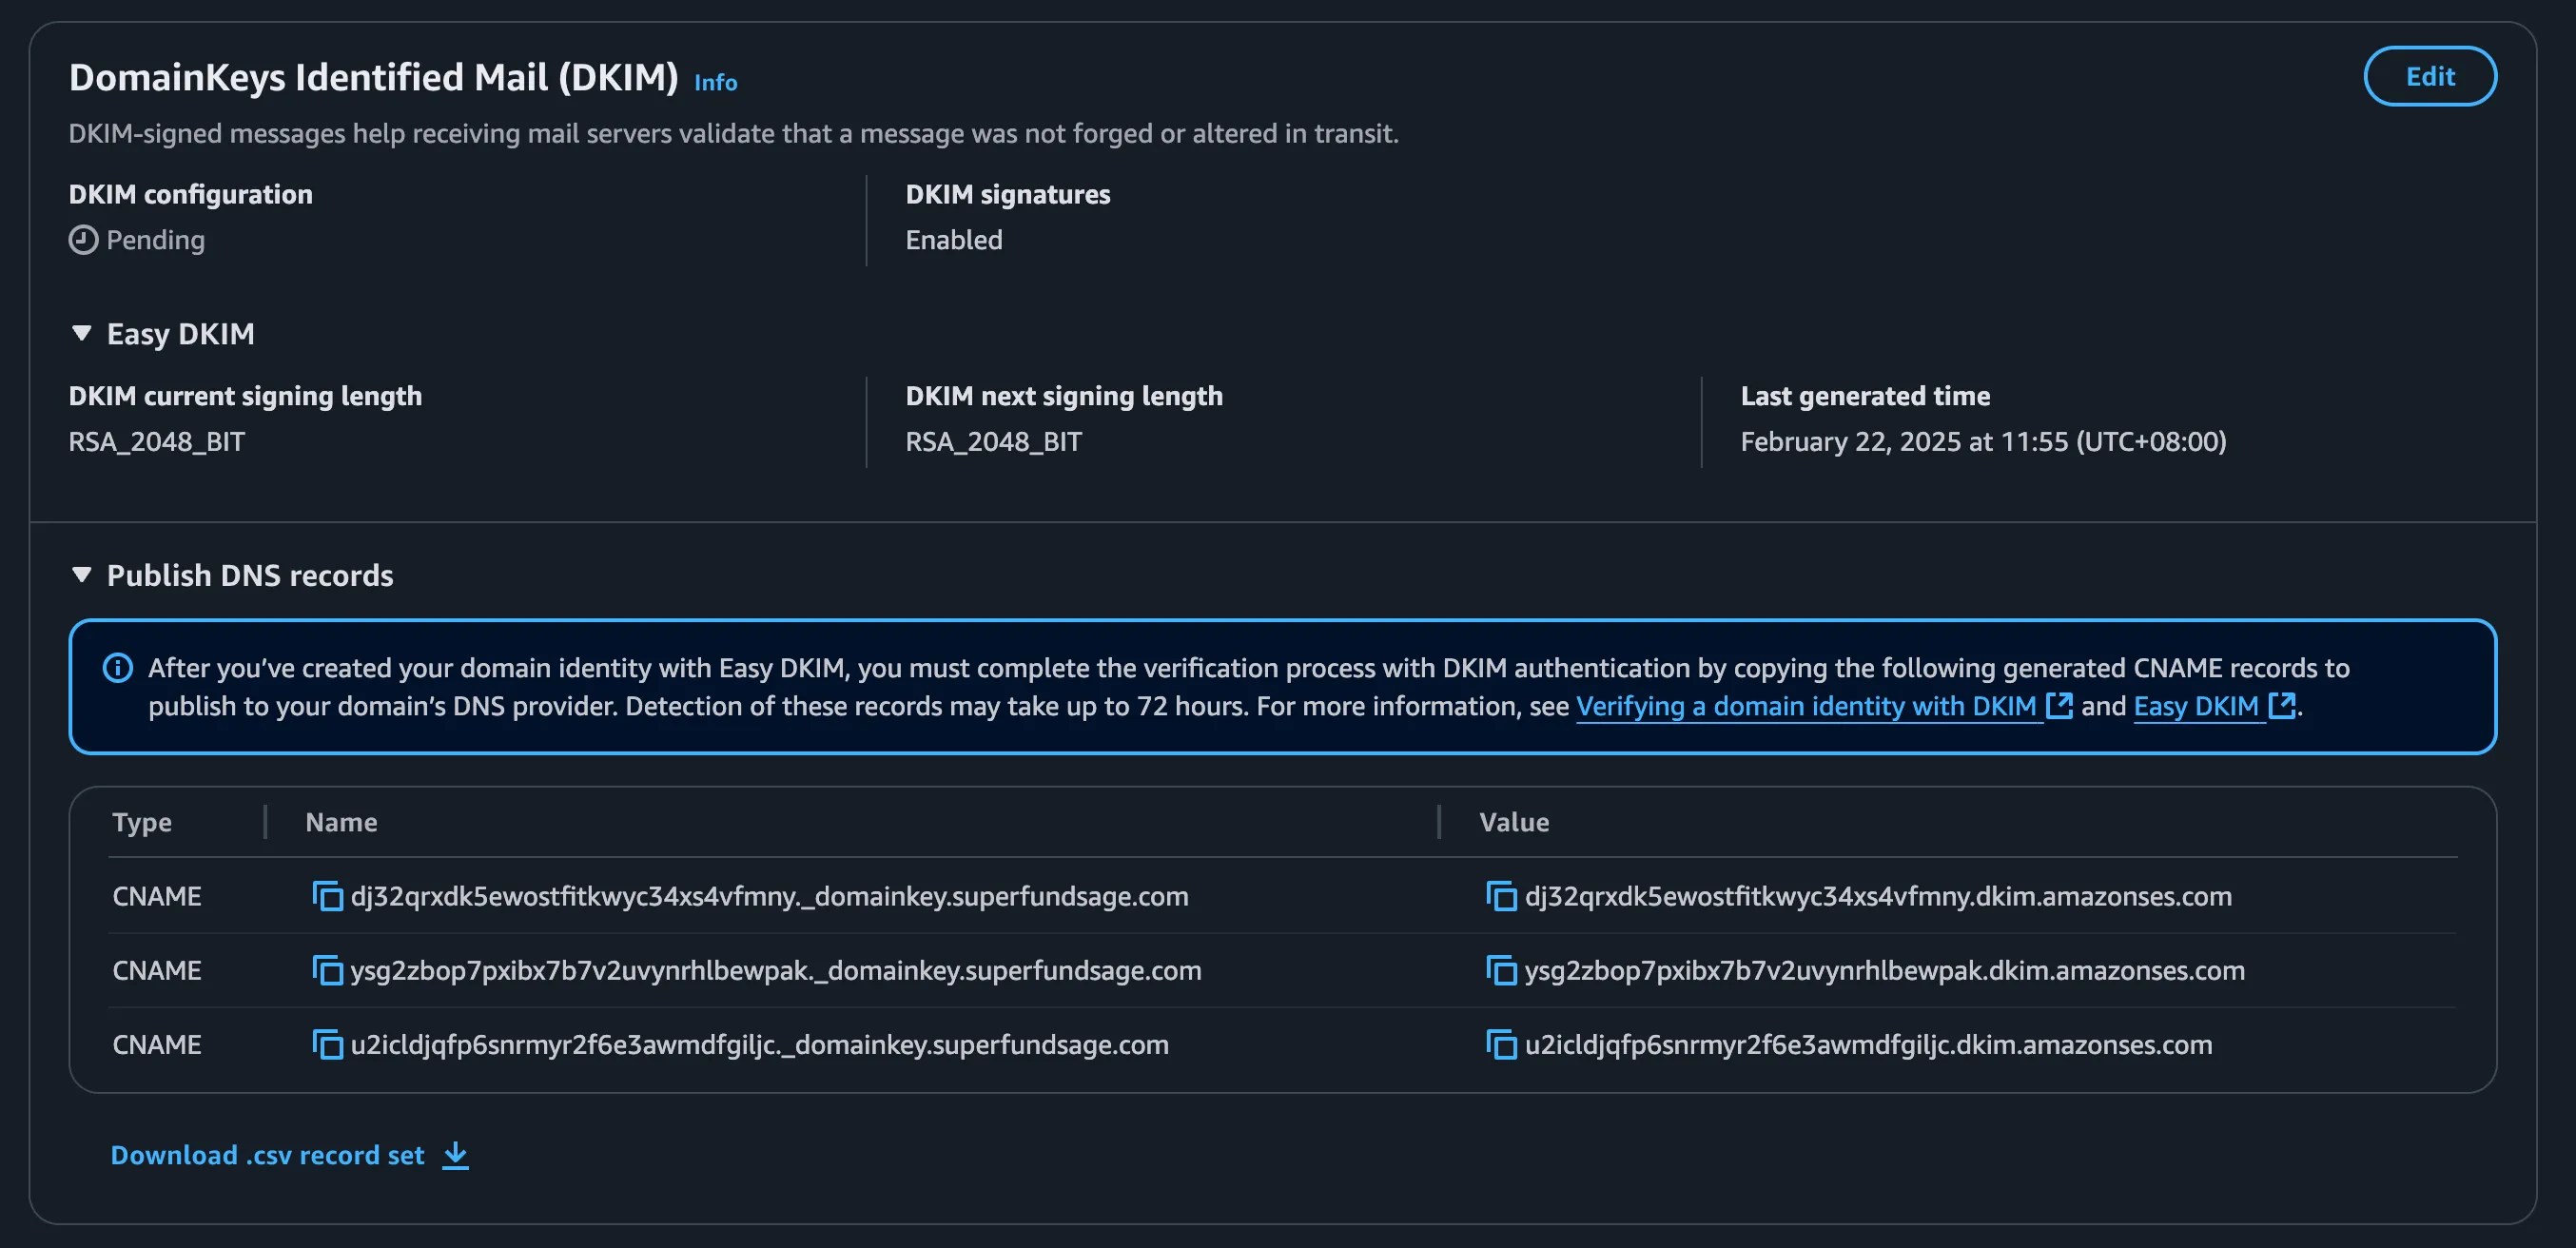
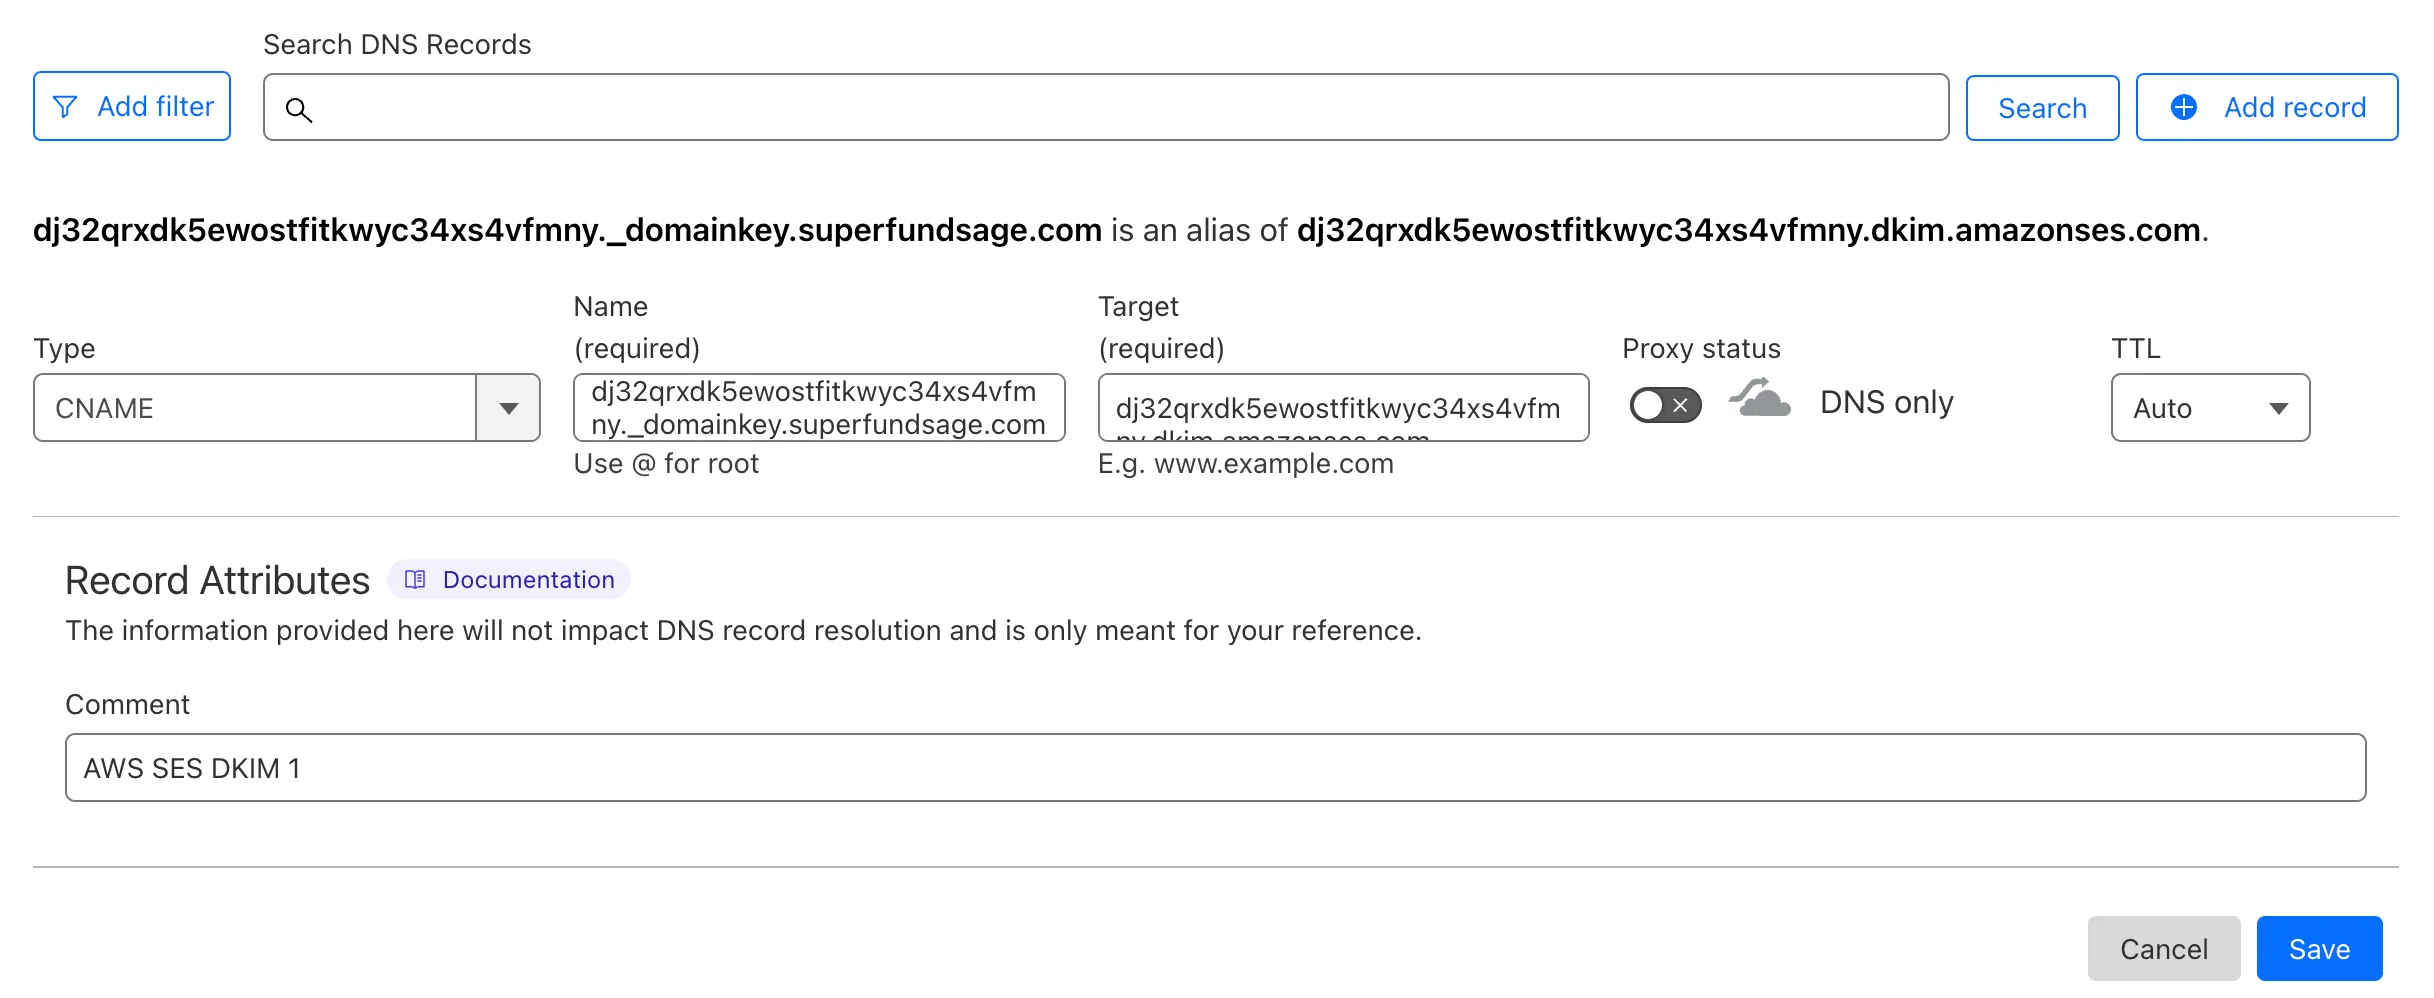
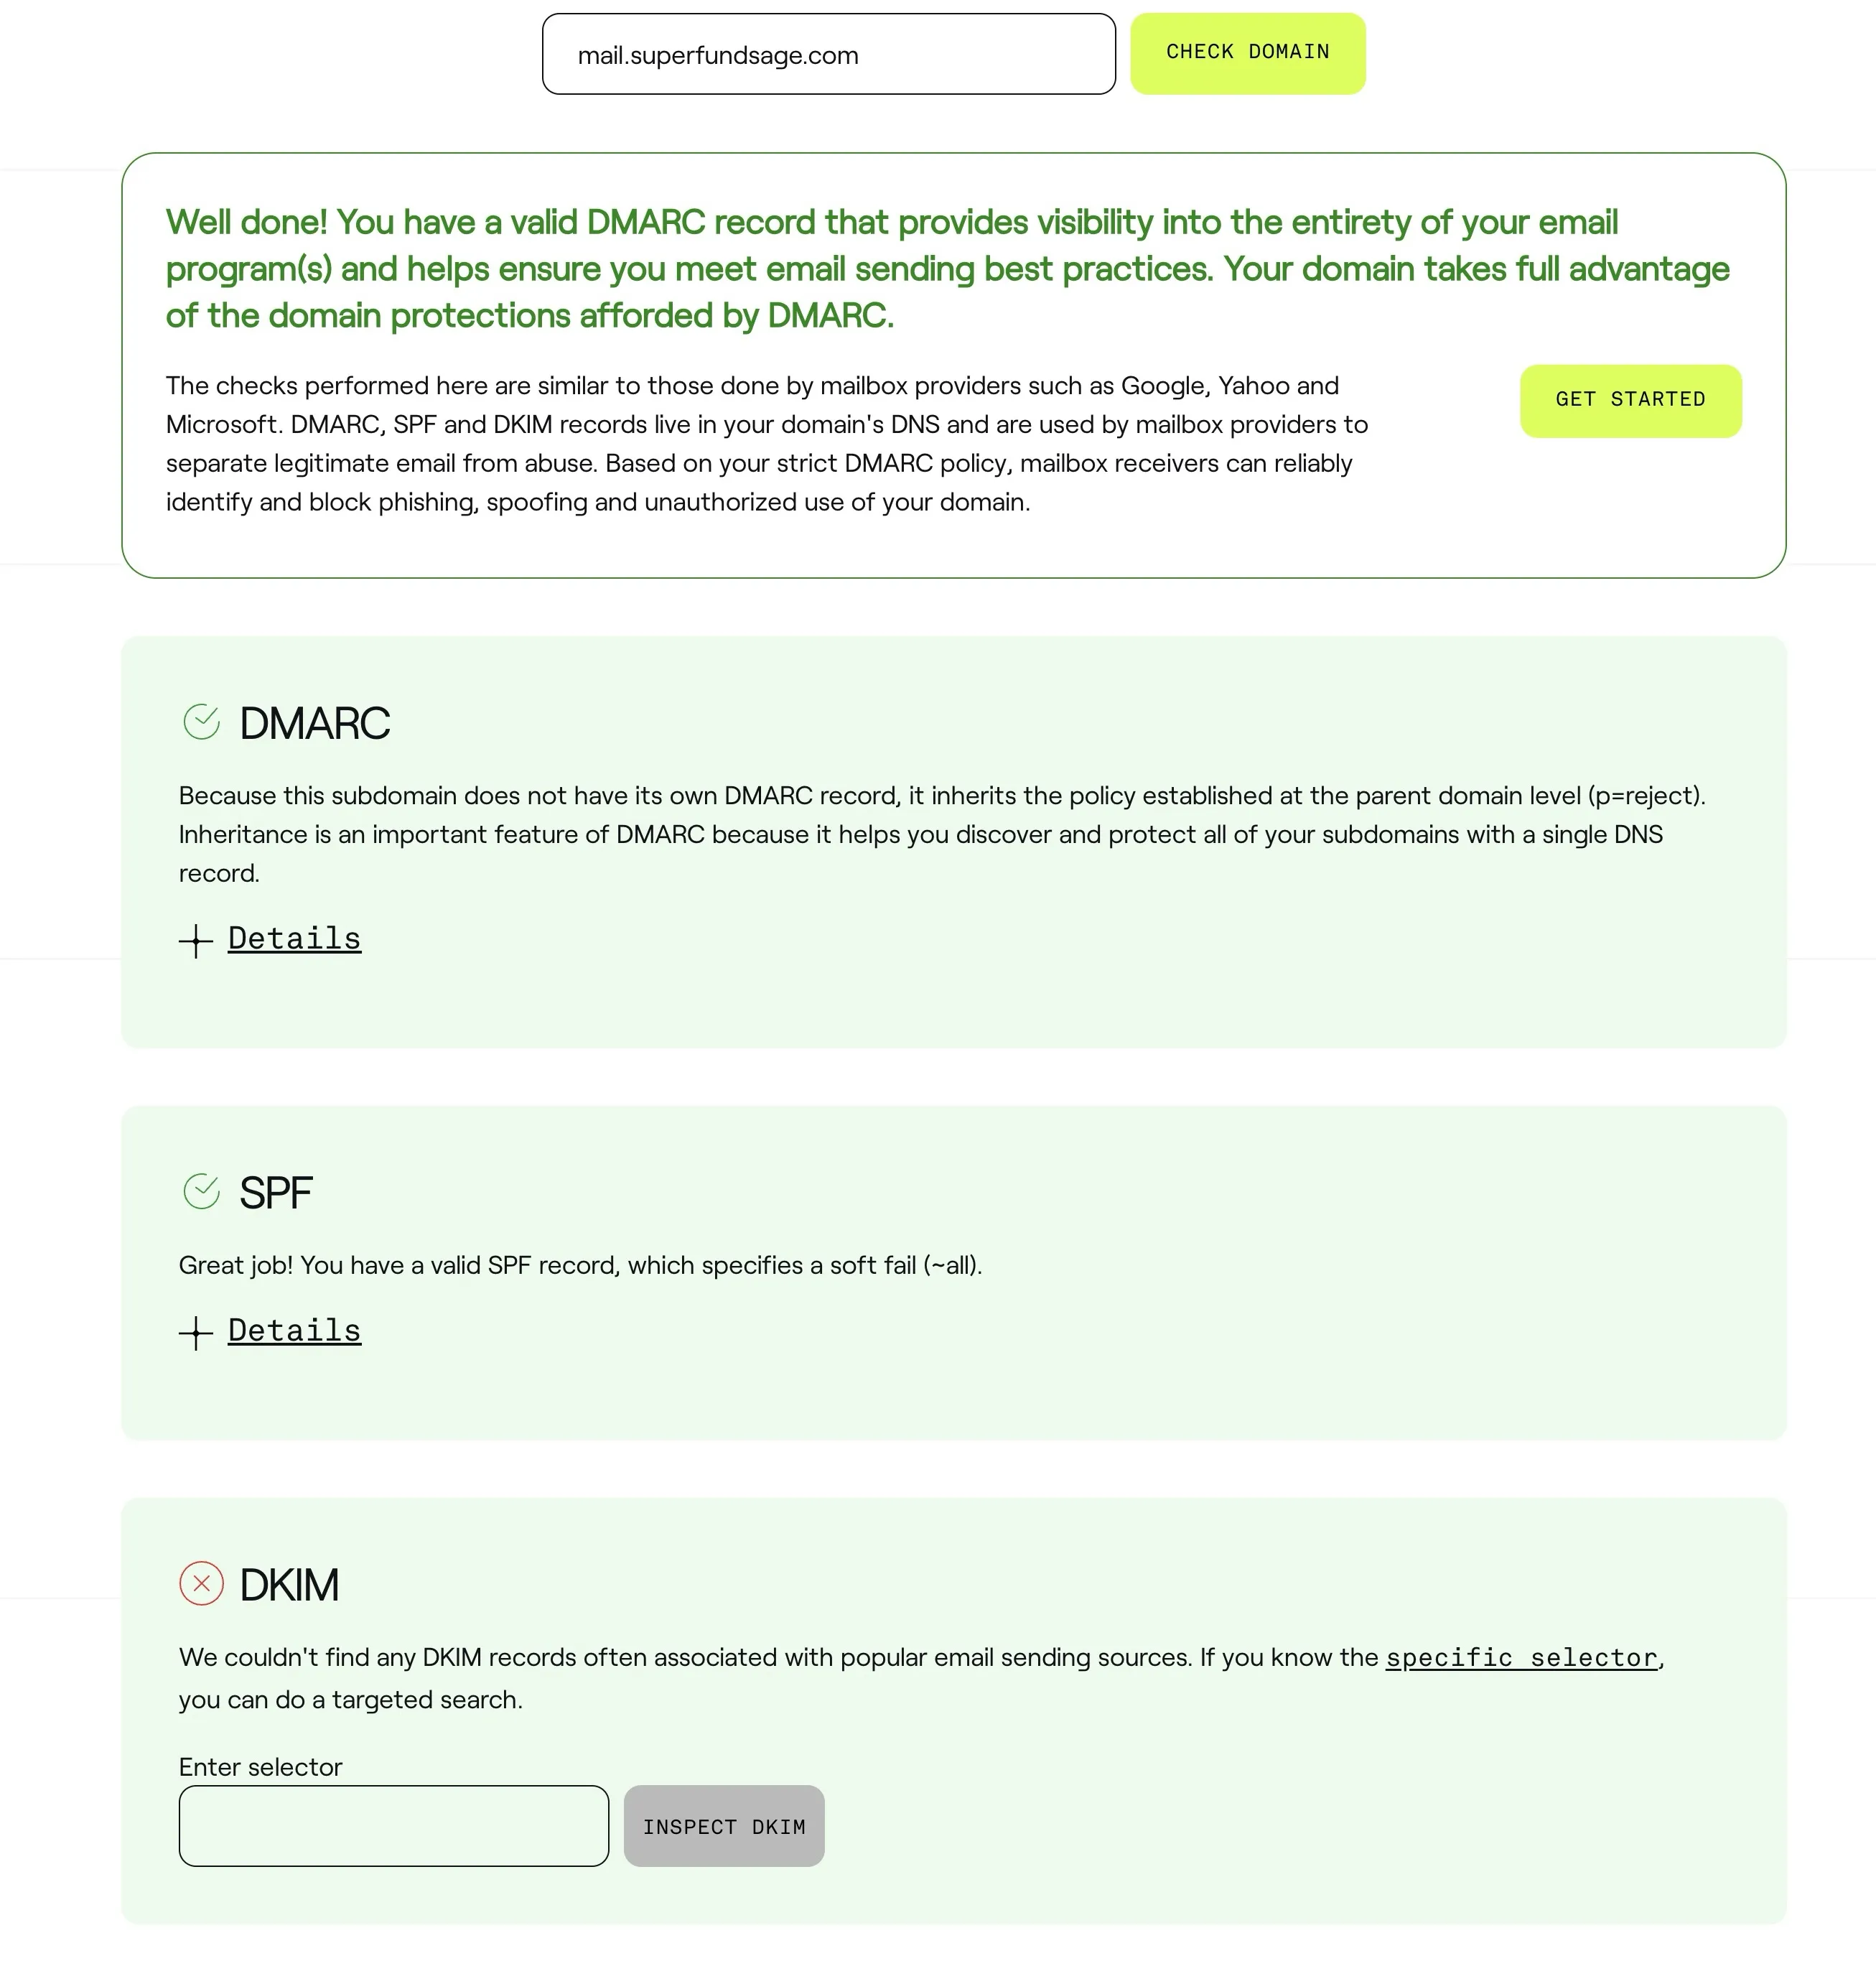
Each record should be added like the above screenshot where the ‘Name’ from SES is put into the ‘Name’ in Cloudflare and the ‘Value’ from SES is put into the ‘Target’ in Cloudflare. - One important things to note is that the Cloudflare Proxy should be turned off for these records. Even though we’re using a subdomain, the DKIM records are set on the root domain as all subdomains inherit DKIM properties from the parent domain. Source. Back in SES, the ‘DomainKeys Identified Mail (DKIM)’ section will eventually update from ‘Pending’ to ‘Completed’. This can potentially take up to 72 hours, but should be confirmed much sooner than that. Checking in with Dmarcian’s domain checker, it appears that our DKIM records can’t be validated

For checking DKIM records, I find their their DKIM Record Checker gives more useful feedback.
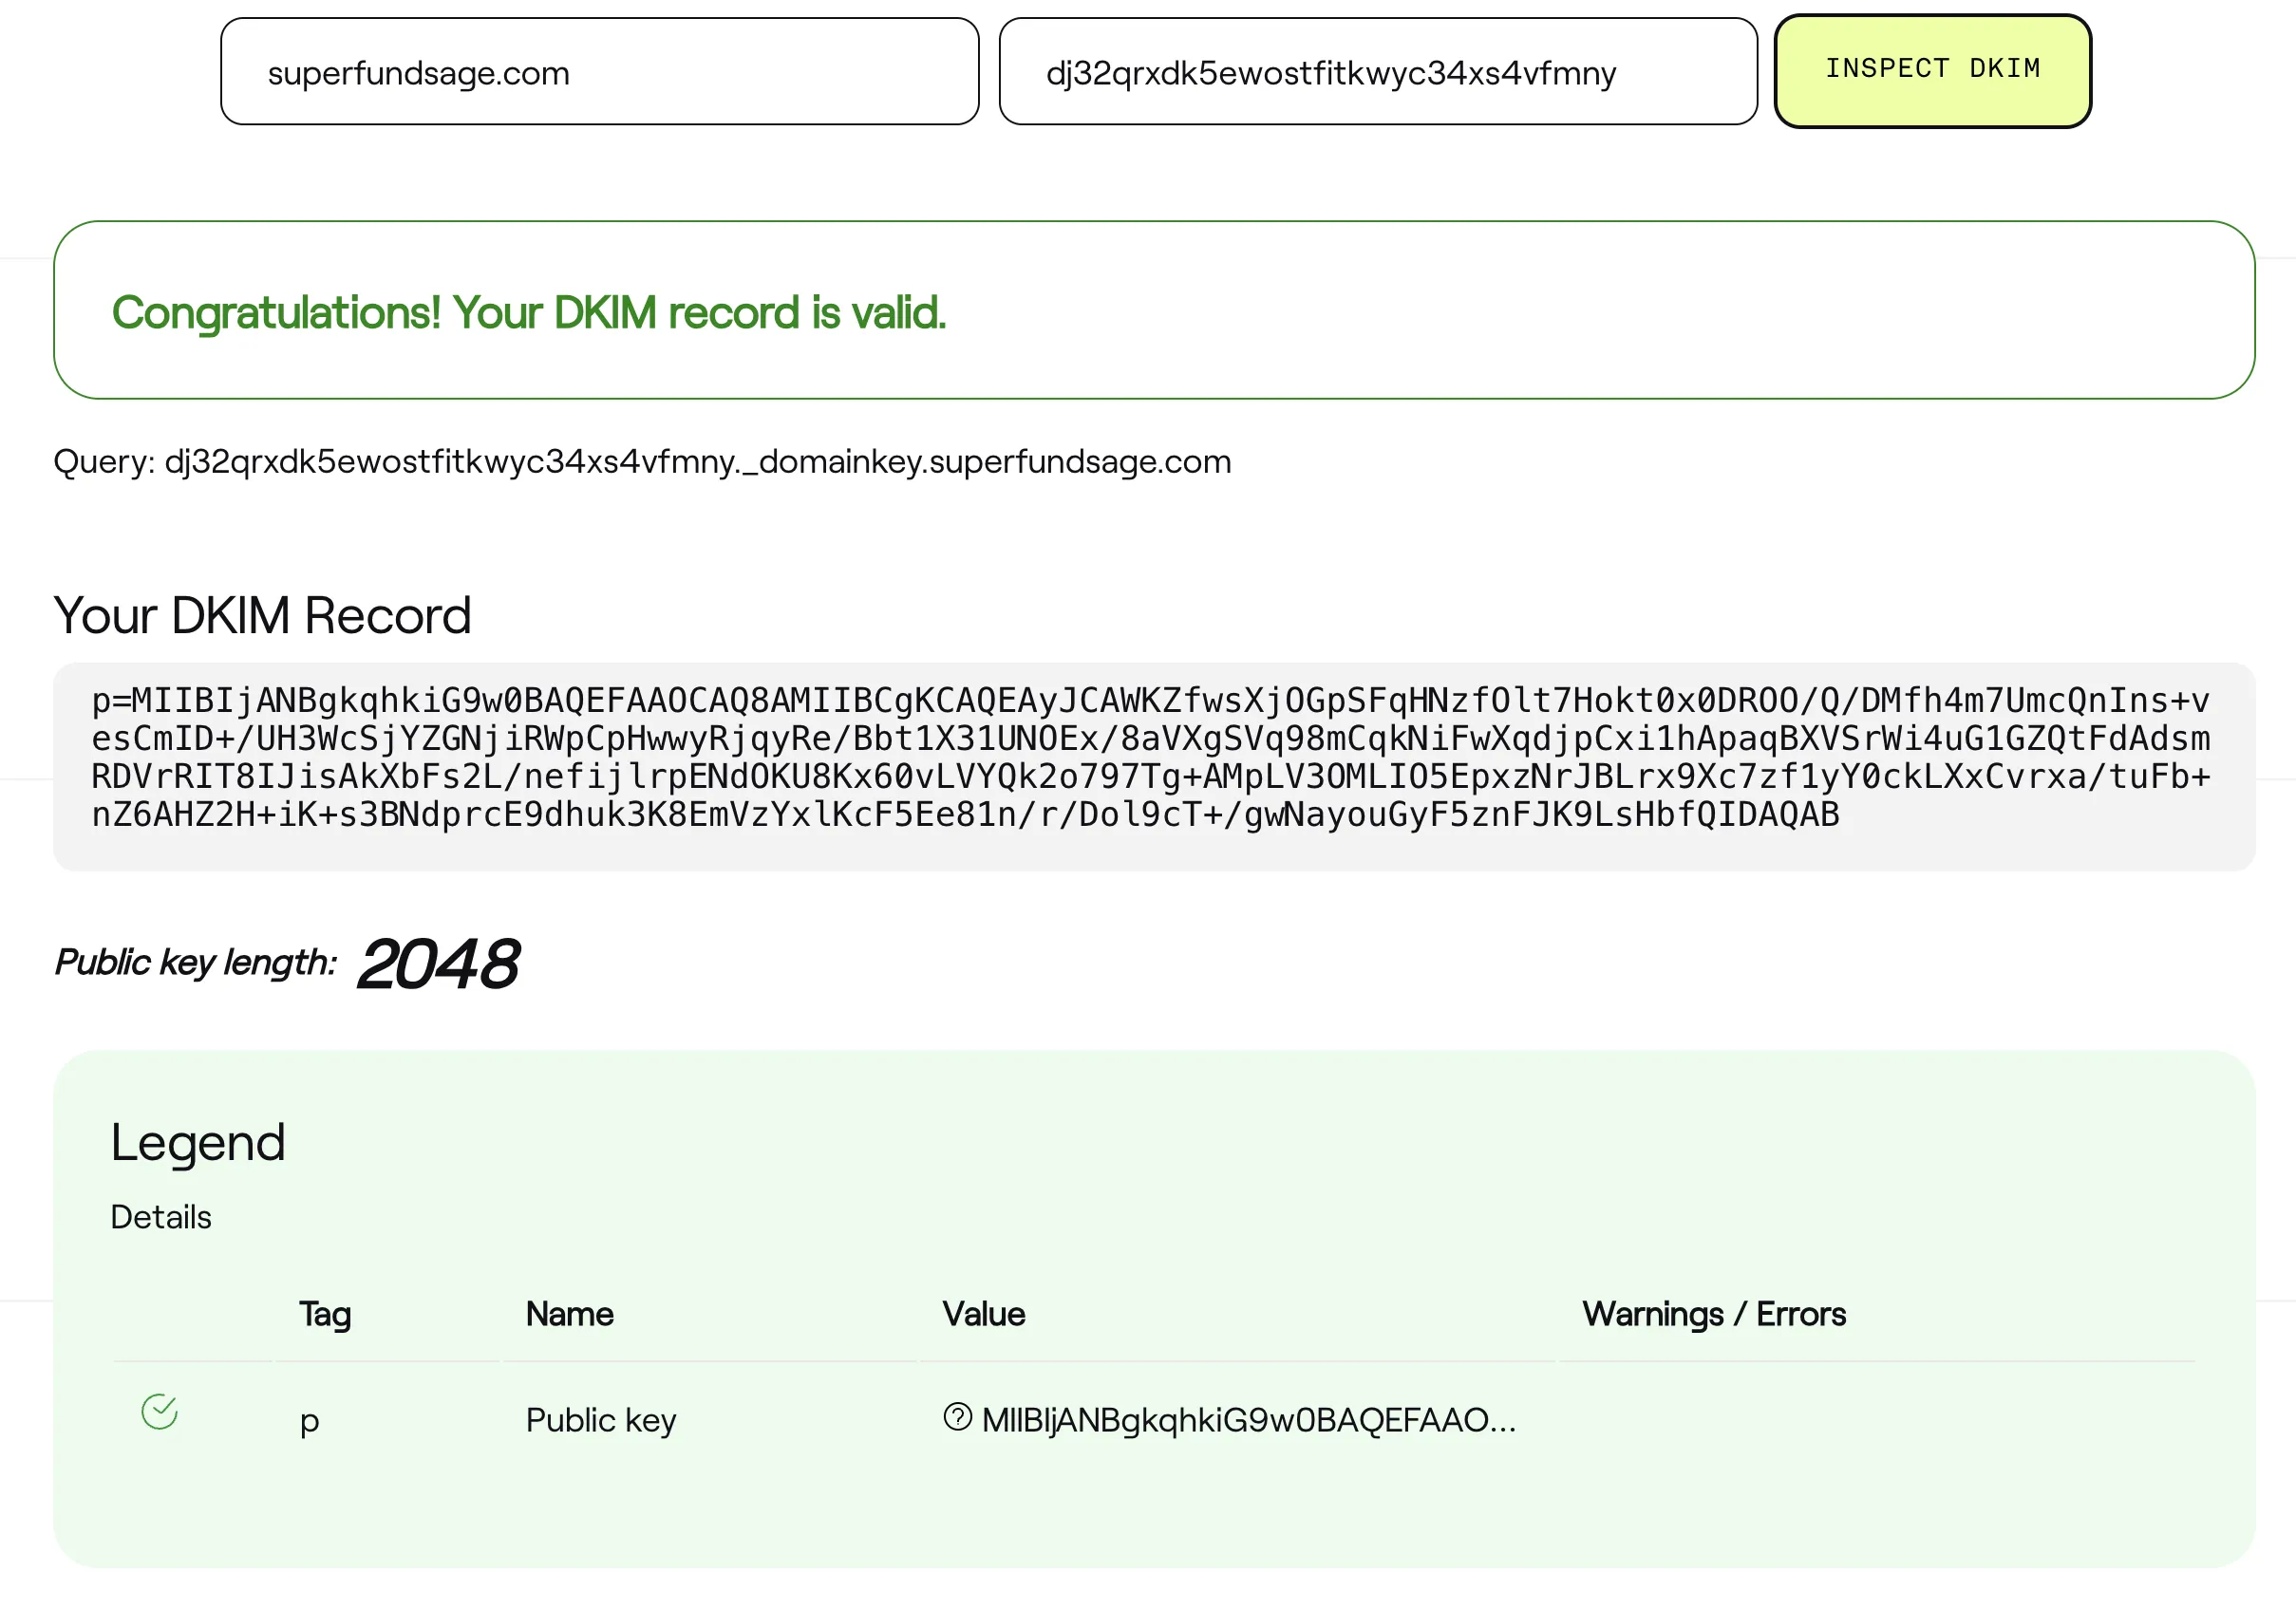
To use this tool, we need to input the root domain and the DKIM selector. So how do I find the DKIM selector? It’s the bit before the _domainkey. So taking one of the DKIM values that SES gave us: dj32qrxdk5ewostfitkwyc34xs4vfmny._domainkey.superfundsage.com, the selector is dj32qrxdk5ewostfitkwyc34xs4vfmny.
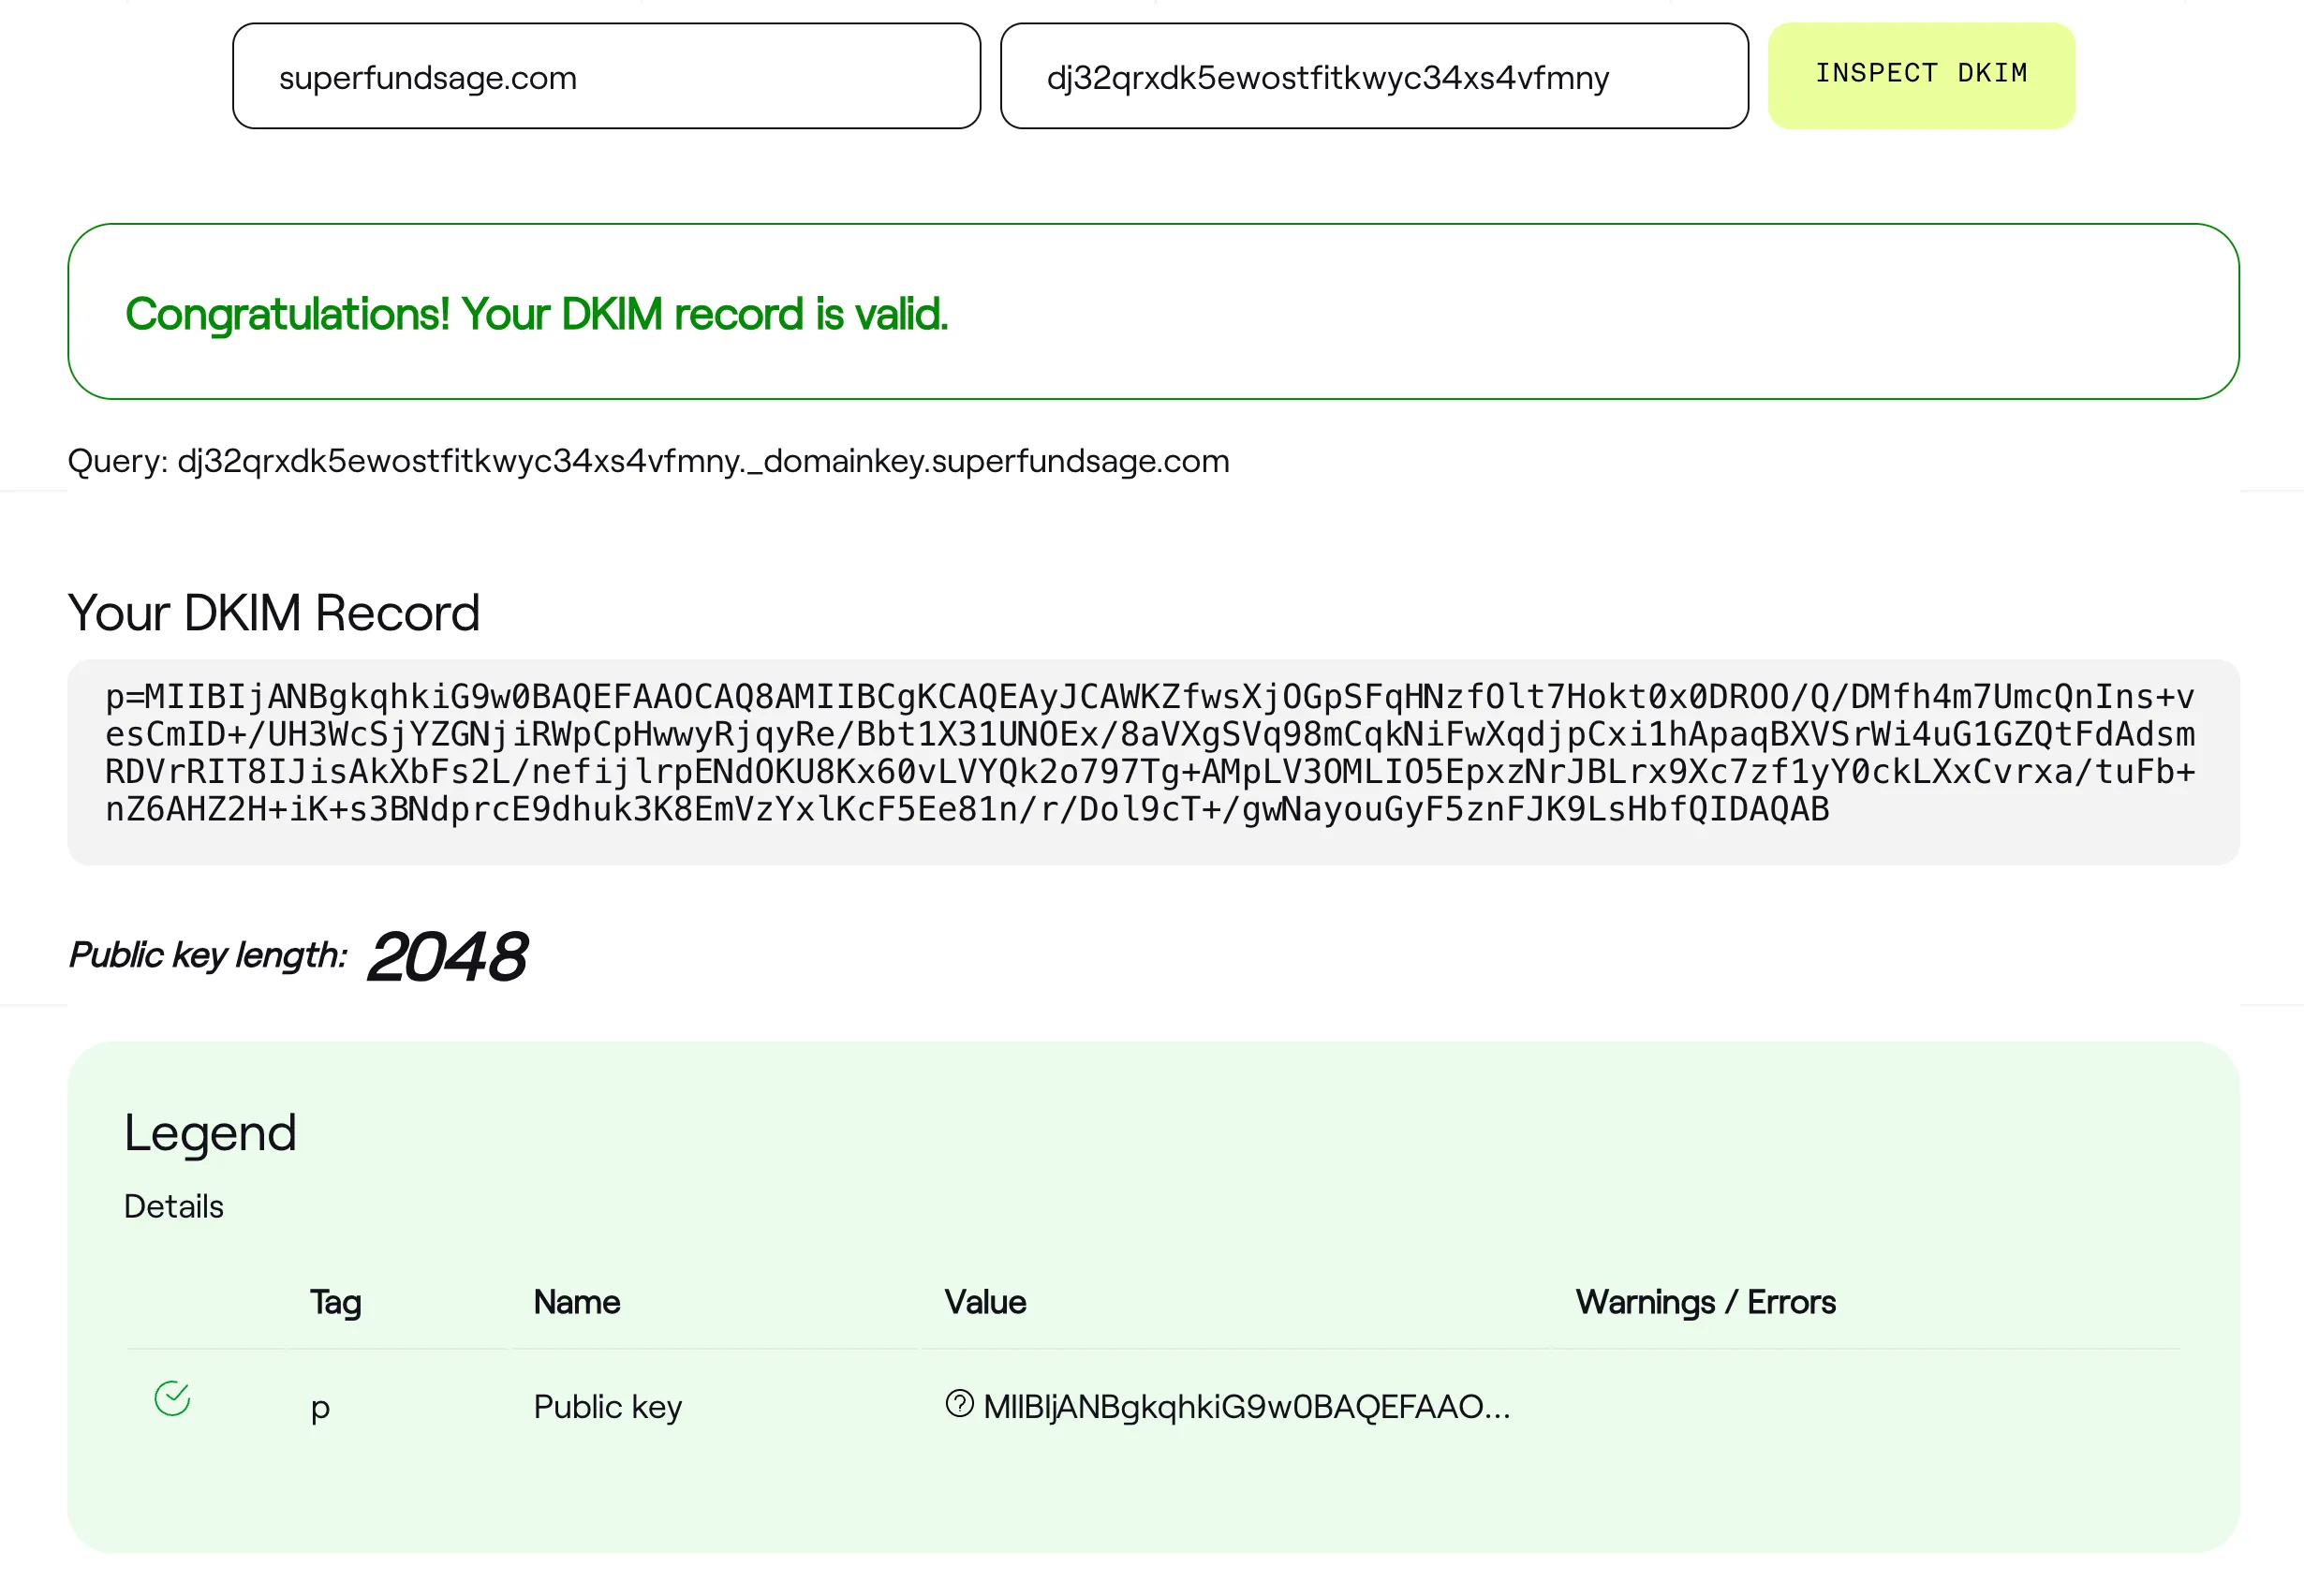
SES gave us three DKIM records, so let’s check the others as well:
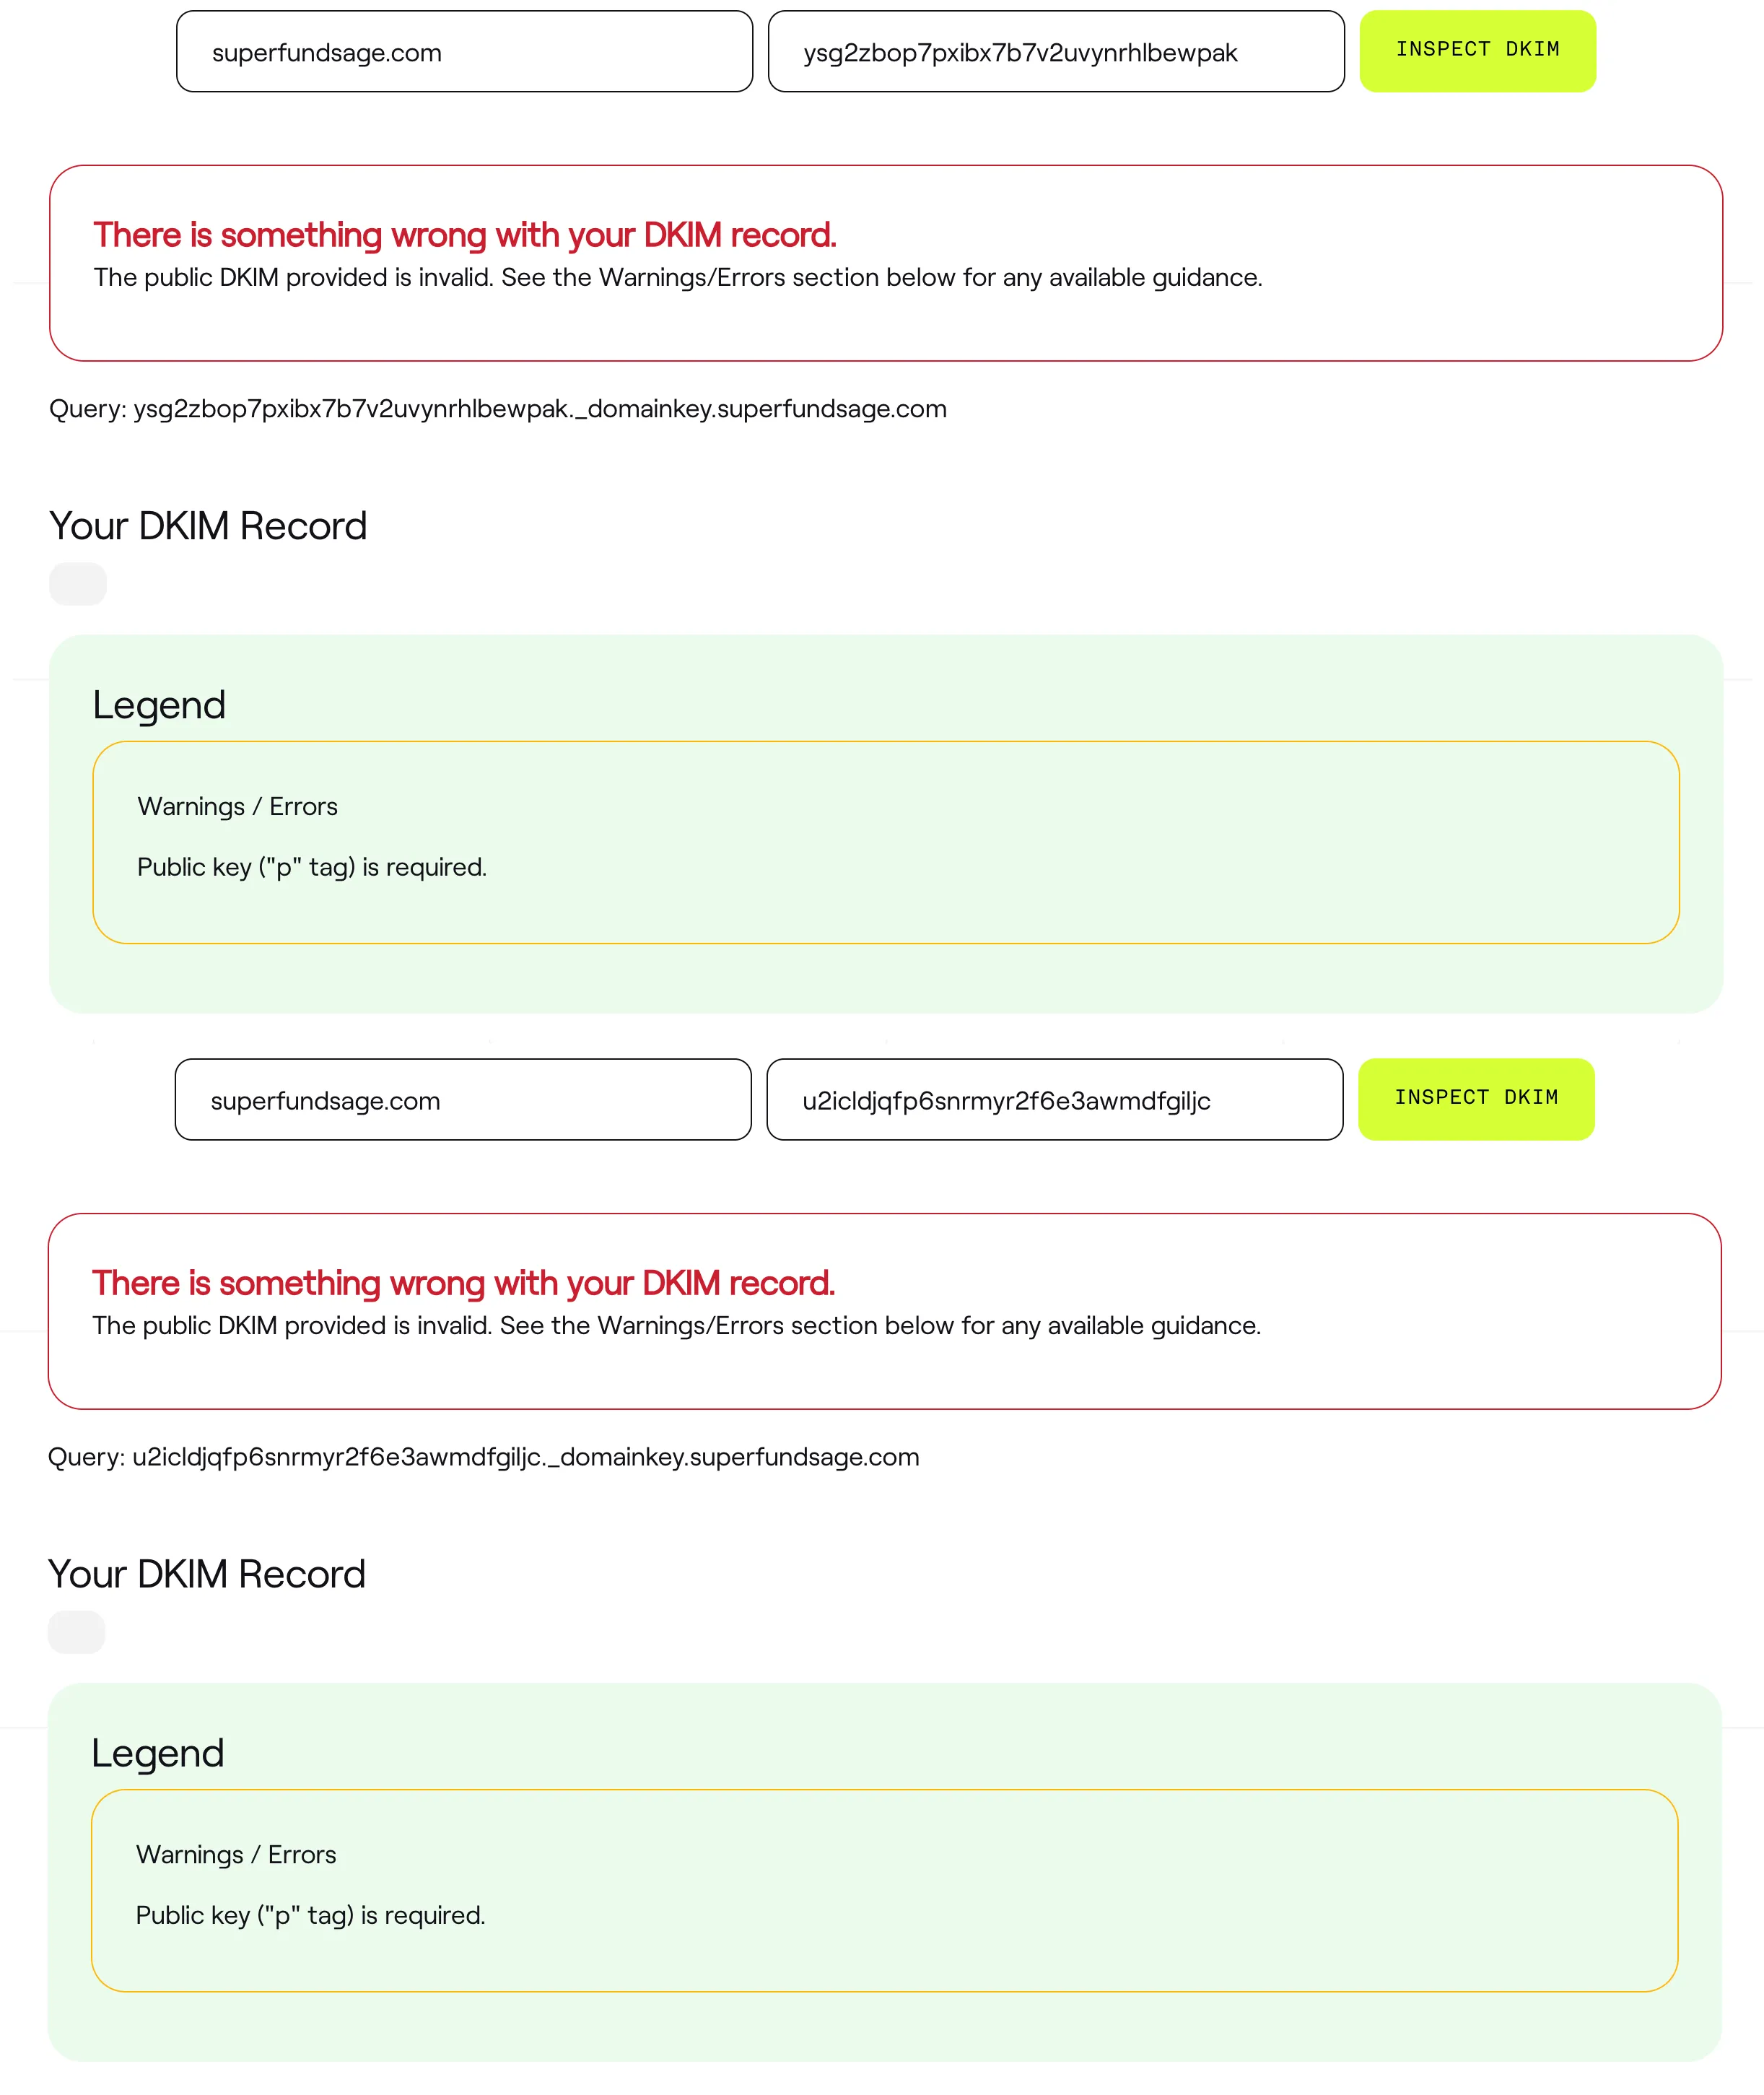
“There is something wrong with your DKIM record. The public DKIM provided is invalid.” isn’t exactly what we were expecting to see. Both failed with “Public key (“p” tag) is required”. So why is this? Well, it turns out that SES only has one DKIM record active at a time and rotates through the three of them, so this is actually expected. Source
This is normal behavior and it is all part of the SES key rotation algorithm. At any point in time, SES has one key active for our domain.
Setting up the custom MAIL FROM domain
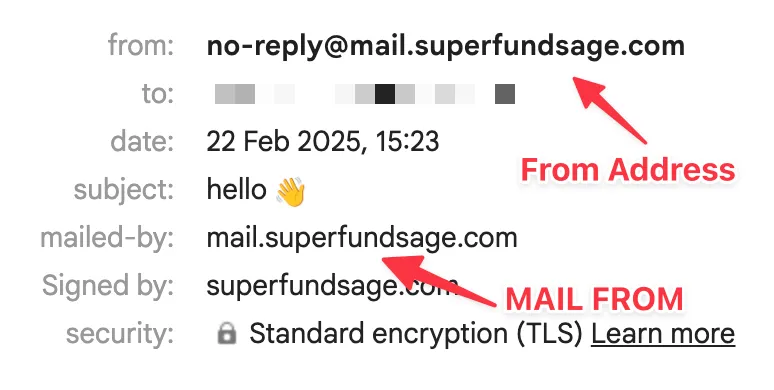
TL;DR of MAIL From and From Address:
- From Address: This is user visible and is what appears in the email head. This is where the email is sent from.
- MAIL FROM: A user has to go hunting for this. This is the address where bounced emails get sent back to.
SES gives you an MX record to receive feedback when your emails have bounced and a TXT record that includes the SPF record. Both of these need to be copied over to your DNS records.
One thing to note when creating the MX record in Cloudflare: SES gives you the priority inline with the feedback domain. The priority, in this case 10, should be removed when pasting the value into the Cloudflare ‘Mail server’ input.
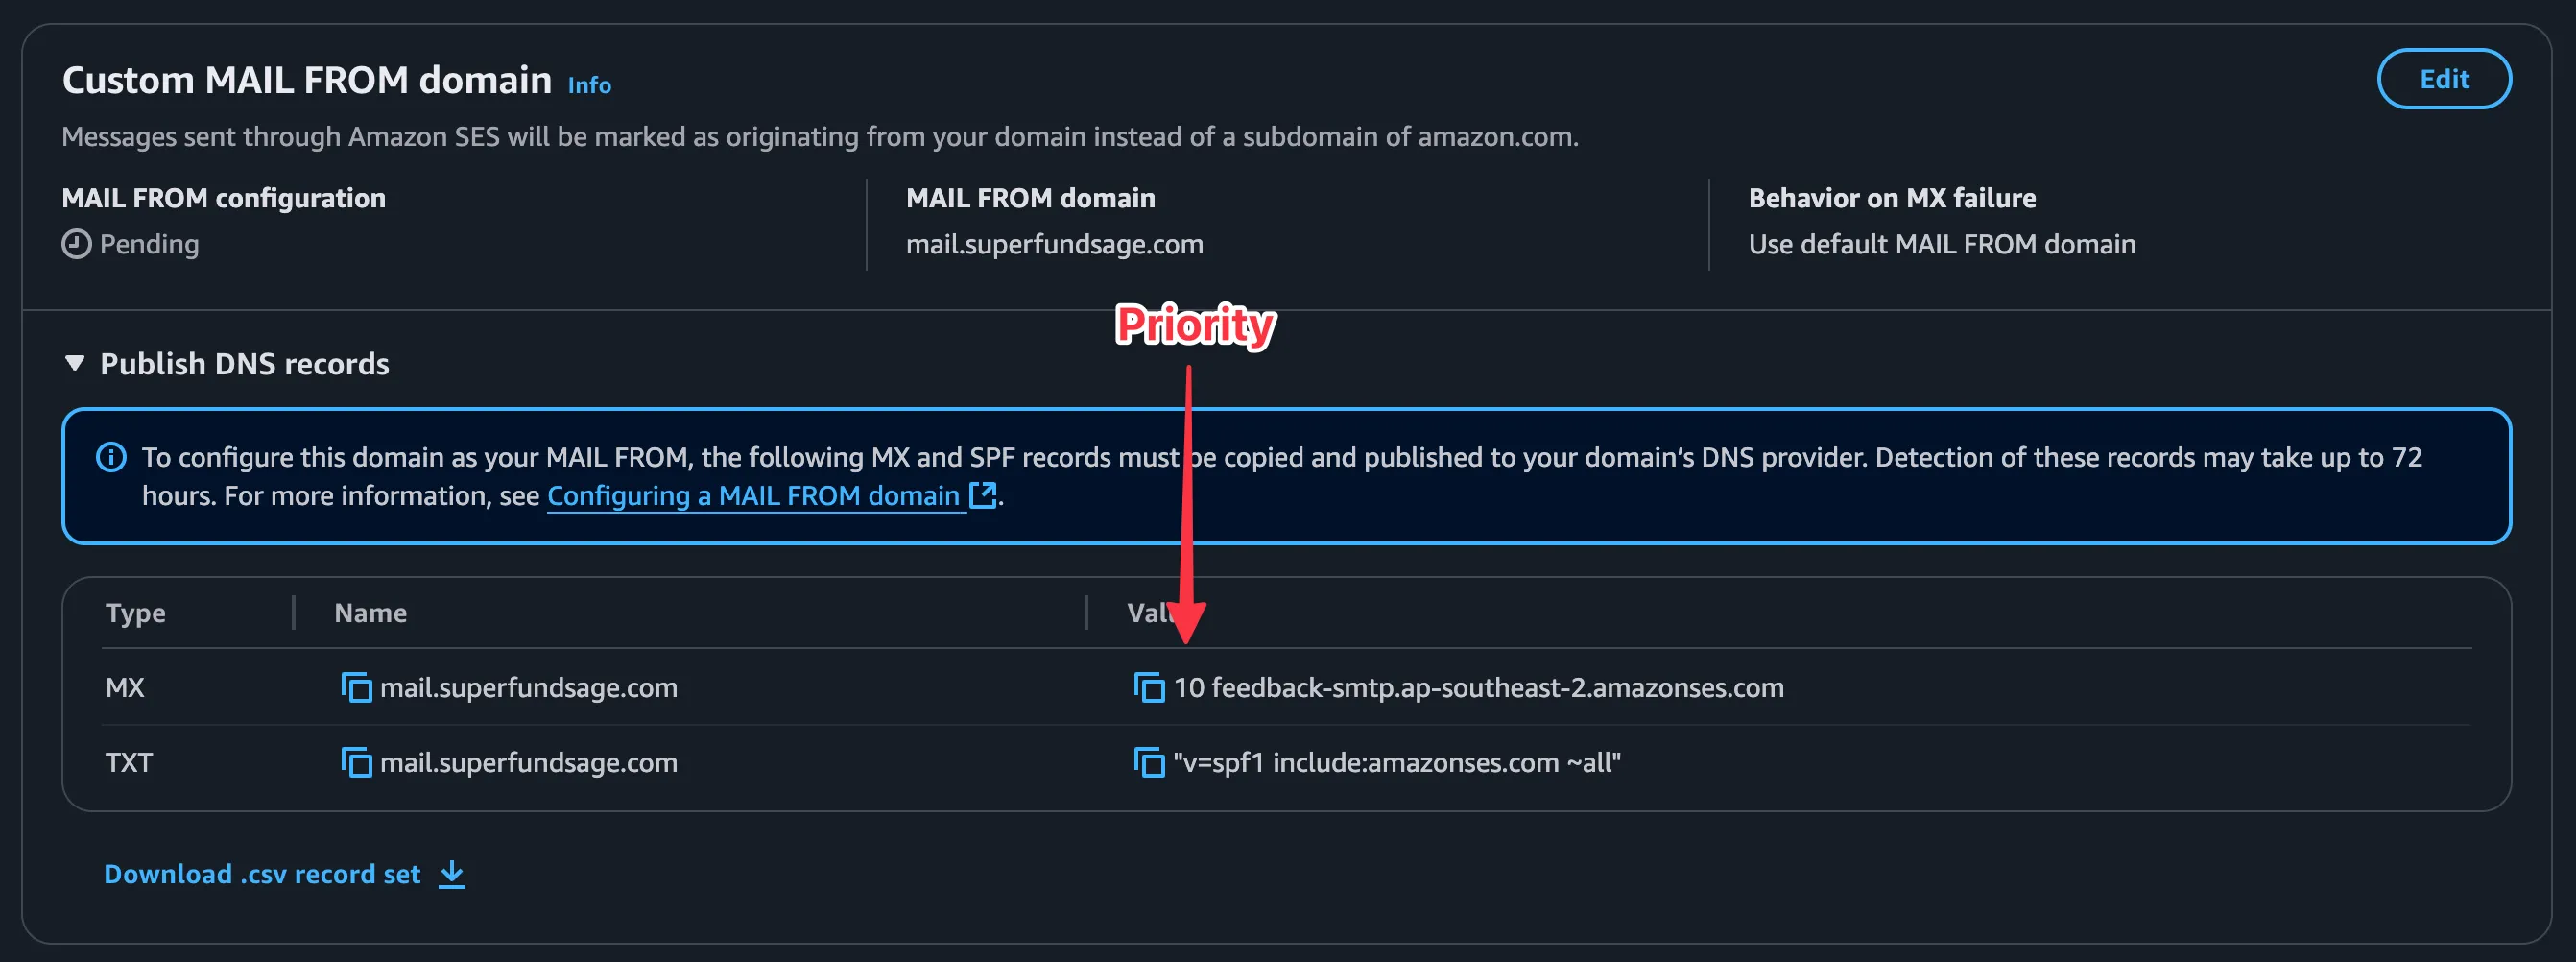
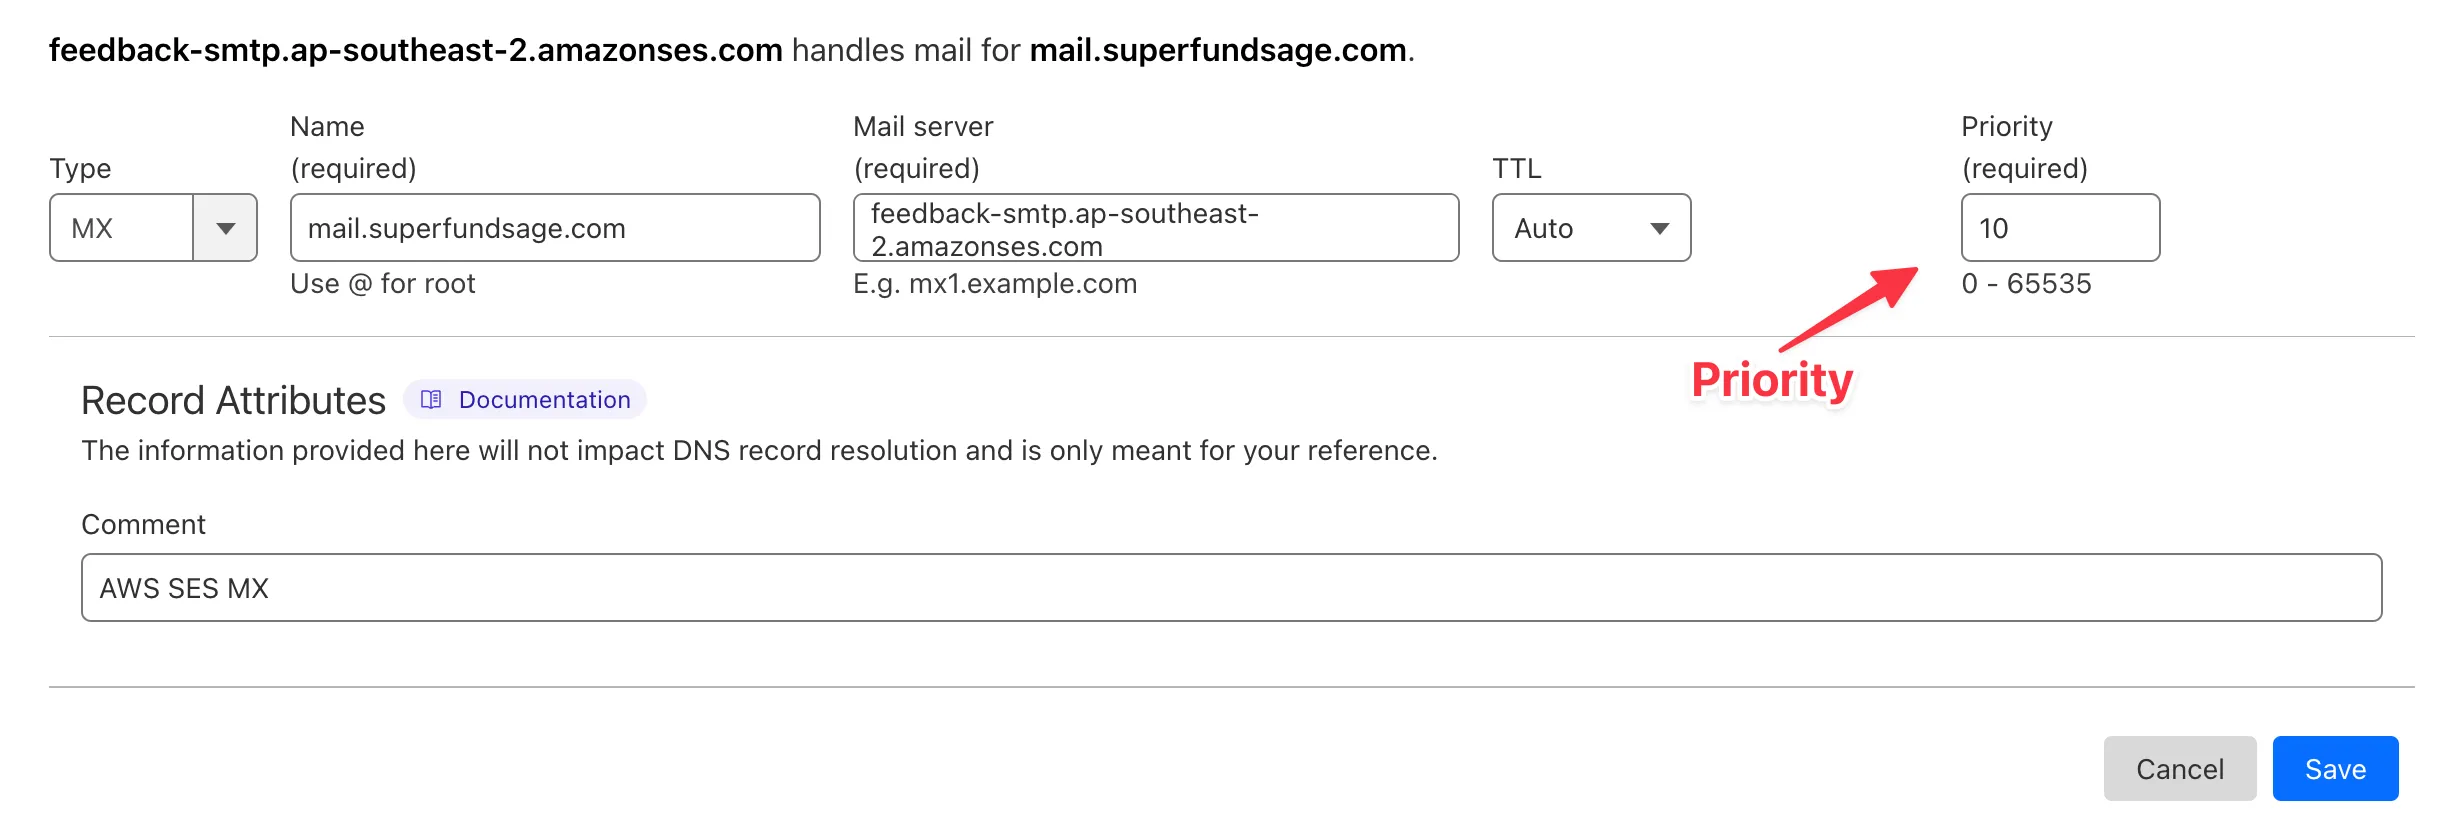
Again, back in SES, the ‘Custom MAIL FROM domain’ section will eventually update from ‘Pending’ to ‘Completed’. Checking in with Dmarcian’s domain checker, we can see that the SPF record has been validated

Setting up DMARC
SES gives you a single TXT record to add to your DNS for DMARC. The record’s value specifies the DMARC settings and SES gives you some very broad settings by default.

The DMARC settings above essentially translate to “if DKIM or SPF fails, don’t do anything” ie don’t put the email in the spam folder and don’t outright reject the email which the other valid options.
This is a good starting point if you’re implementing DMARC alignment on an established domain that you’ve been sending emails on for a while and you don’t want to accidentally tank your deliverability.
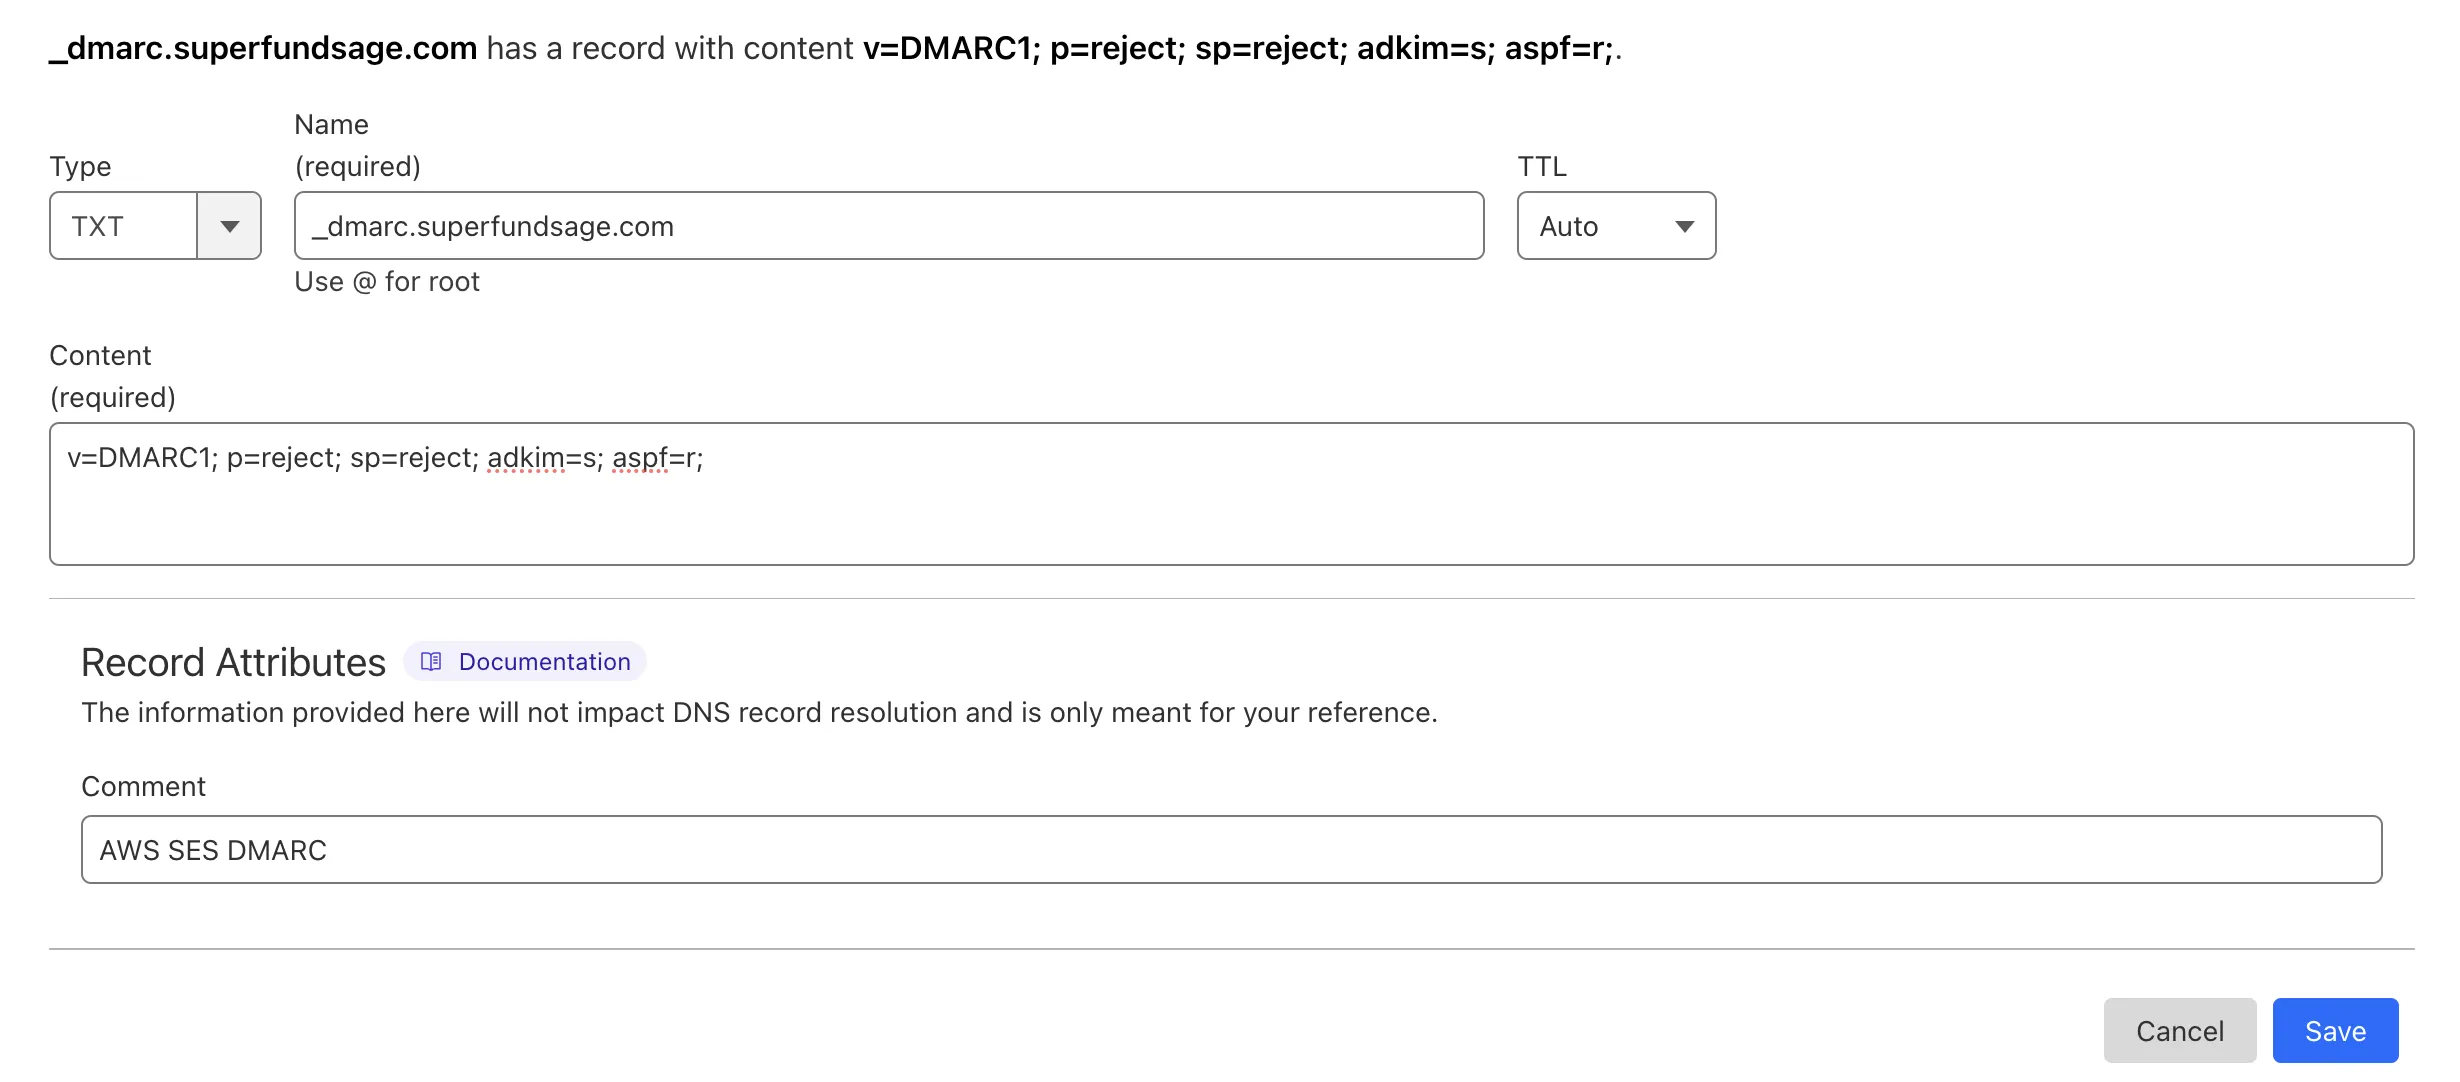
I’m going to use slightly stricter and more explicit settings: v=DMARC1; p=reject; sp=reject; adkim=s; aspf=r;.
The breakdown is:
p=reject: Any emails that fail authentication will be completely rejectedsp=reject: Same policy applies to subdomains. Needed as our MAIL FROM address ismail.superfundsage.com.adkim=r: The From Address domain has to match the root domain used in the DKIM signature. We can’t use the stricteradkim=shere as we’re sending from a subdomain and our DKIM records are on the root domain. If our From Address wassuperfundsage.cominstead, we could setadkim=s.aspf=r: The domains in the From Address and MAIL FROM have to have the same root domain to pass.
aspf=r is VERY important for SES. In fact, if you want SPF alignment with SES, you cannot have a strict SPF policy (aspf=s). Source
In order to achieve SPF alignment with SES, the domain’s DMARC policy must not specify a strict SPF policy (
aspf=s).
Other tags you may want in your DMARC record is rua for receiving DMARC reports and ruf for receiving forensic reports for tracking failed messages.
After all that, be sure to actually add the DMARC policy to your DNS:
Confirming everything works
Heading back to Dmarcian’s domain checker one last time, DMARC and SPF are set up correctly for our subdomain.
As we now know, the DKIM records can’t be found automatically, but if we specify the selectors on their DKIM specific tool, they show up:
One more check we can do is to send an email from our domain and make sure everything is passing there as well. Once you send the email, open it up and click on the three dots and then ‘Show original’.
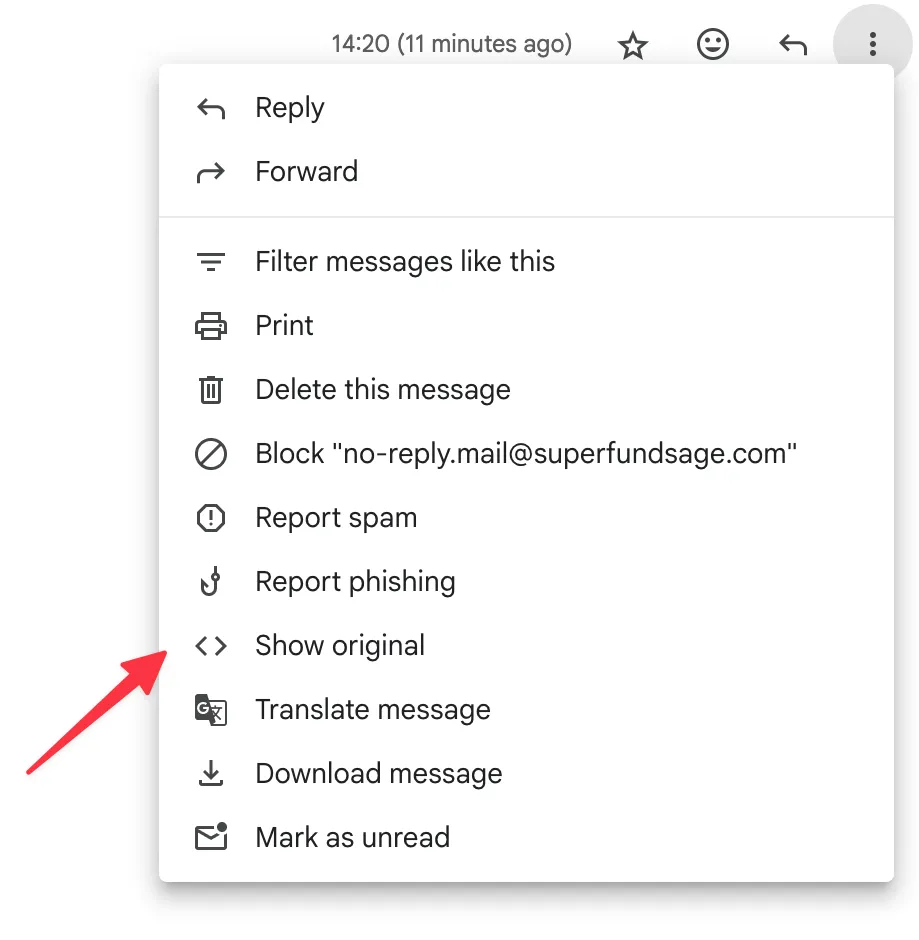
In the section at the top, we can see that SPF, DKIM, and DMARC are all passing 🎉

And there we have it: full DMARC alignment across both SPF and DKIM when sending from a subdomain with AWS SES 🎉.
Next Steps
Some next steps if you got this far and want to take it to the next level would be:
- Adding SPF records to any dormant domains you have lying around that you don’t send emails from so they can’t be spoofed.
- Adding
v=SPF1 -allto a domain essentially means “this domain does not send any emails”.
- Adding
- Increasing the strictness of the
adkimandaspfDMARC aligments. - Adding
ruafor receiving DMARC reports andruffor receiving forensic reports for tracking failed messages to keep track of how your emails are being received.